1. MSI Basics
How long will it take to assess a material with the Higg MSI? The time required to assess a material in the Higg MSI will vary based on the type of material you wish to assess, the level of customization desired, and the amount of information you have already gathered. Depending on these factors, we estimate that it can take between 2-10 minutes to assess one material. As you become more familiar with the tool, you will be able to assess materials in less time.| Material(s) | Example | Time Needed |
| One Example Material (customizing the material set-up page only) | Using “Cotton Fabric” with unknown manufacturing details (ex. 200 DTEX, circular knit, batch dyed Cotton fabric) | 2-3 minutes |
| Blend of 2+ Example Materials | 50% PolyesterFabric / 50% Cotton Fabric blend with unknown manufacturing details (ex. 200 DTEX, circular knit, batch dyed, Cotton fabric with a fossil fuel based, continuous filament, 200 DTEX, batch dyed Polyester fabric) | 3-5 minutes |
| One Custom Material | Customizing “Polyester Fabric” (ex. adding Global Recycled Standard (GRS) and Bluesign certifications, solution dyed, mechanically recycledPolyester, 45 DTEX Polyester yarn, woven) | 5-7 minutes |
| Blend of 2+ Custom Materials | Customizing a 50% Polyester Fabric / 50% Cotton Fabric blend (ex. 370 DTEX recycled Cotton, spun for weaving, bleached, dyed with continuous dyeing with a GRS and Bluesign certified, solution dyed, mechanically recycled, 45 DTEX Polyester extruded fiber, spun for woven, with no scouring or heat setting) | 6-10 minutes |
Who to engage on the Higg MSI
The basic information needed to start using the Higg MSI may be easy to access—for instance, on an item’s care content label.
Full understanding and customization of materials can require engagement with those who are buying, using, or manufacturing materials.Depending on your company and role, there may be people and resources within your company and/or outside of your company to consult.
| Your Company/Role | Internal Resources | External Resources |
| Retailer sustainability team | Product sourcing team (sourcing manager, product manager, retail buyer) | |
| Retailer product sourcing team | Brand sales representative for the product | |
| Brand sales representative | Brand sustainability team, design &development team (designer, product developer, material developer) | |
| Brand sustainability team or design &development team | Product information details (ex. PLM system) | Product manufacturing representative (sourcing agent, sales representative) |
| Product manufacturing representative | Product information details (ex. PLM system) | Material manufacturing representative (sourcing agent, sales representative) |
| Material manufacturing representative | Production manager, manufacturing data system |
How to prepare for the Higg MSI
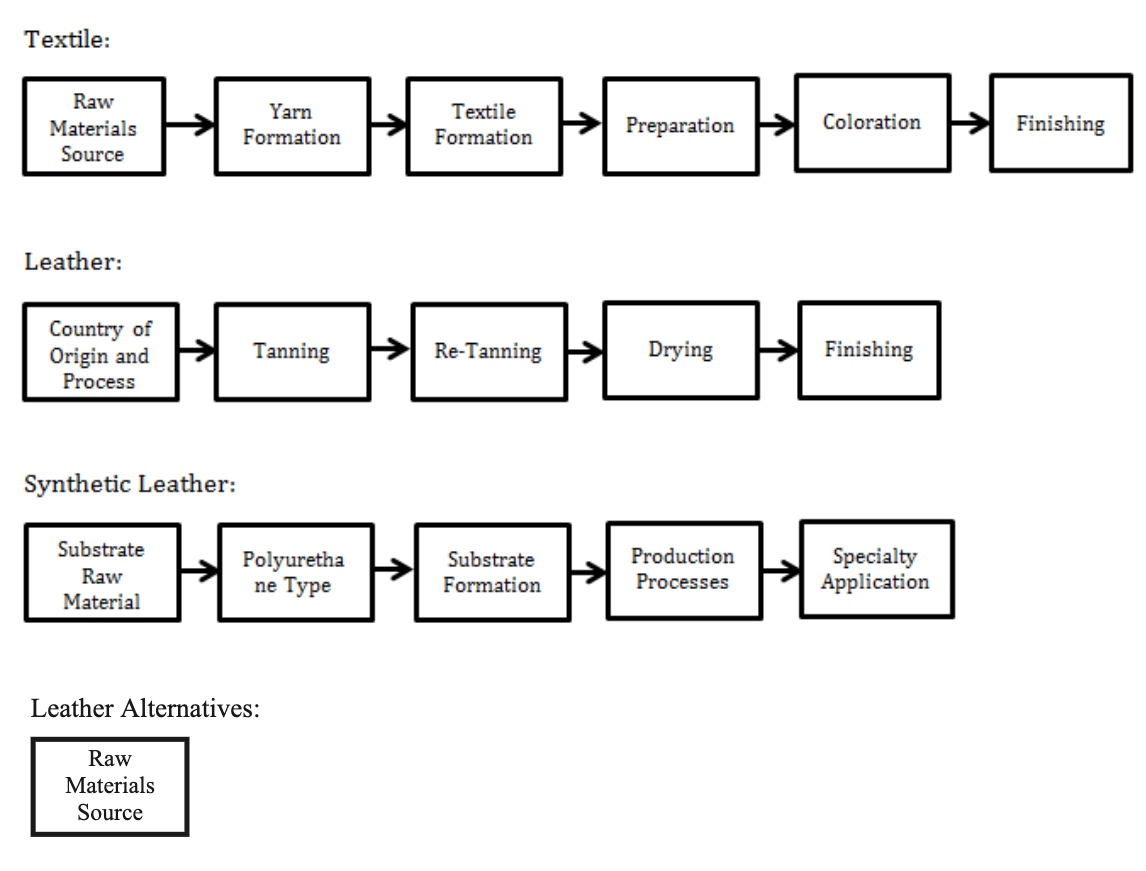
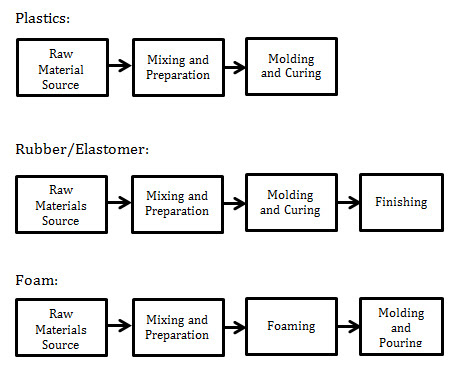
The diagram below shows the categories of information that are helpful to gather. In most cases, the minimum information needed to get started and select an Example Material will be the raw materials source of a Material Category. Additional process information can be used to further customize the materials.

2. Navigating the Higg MSI
Once you have created and activated your Higg MSI account:
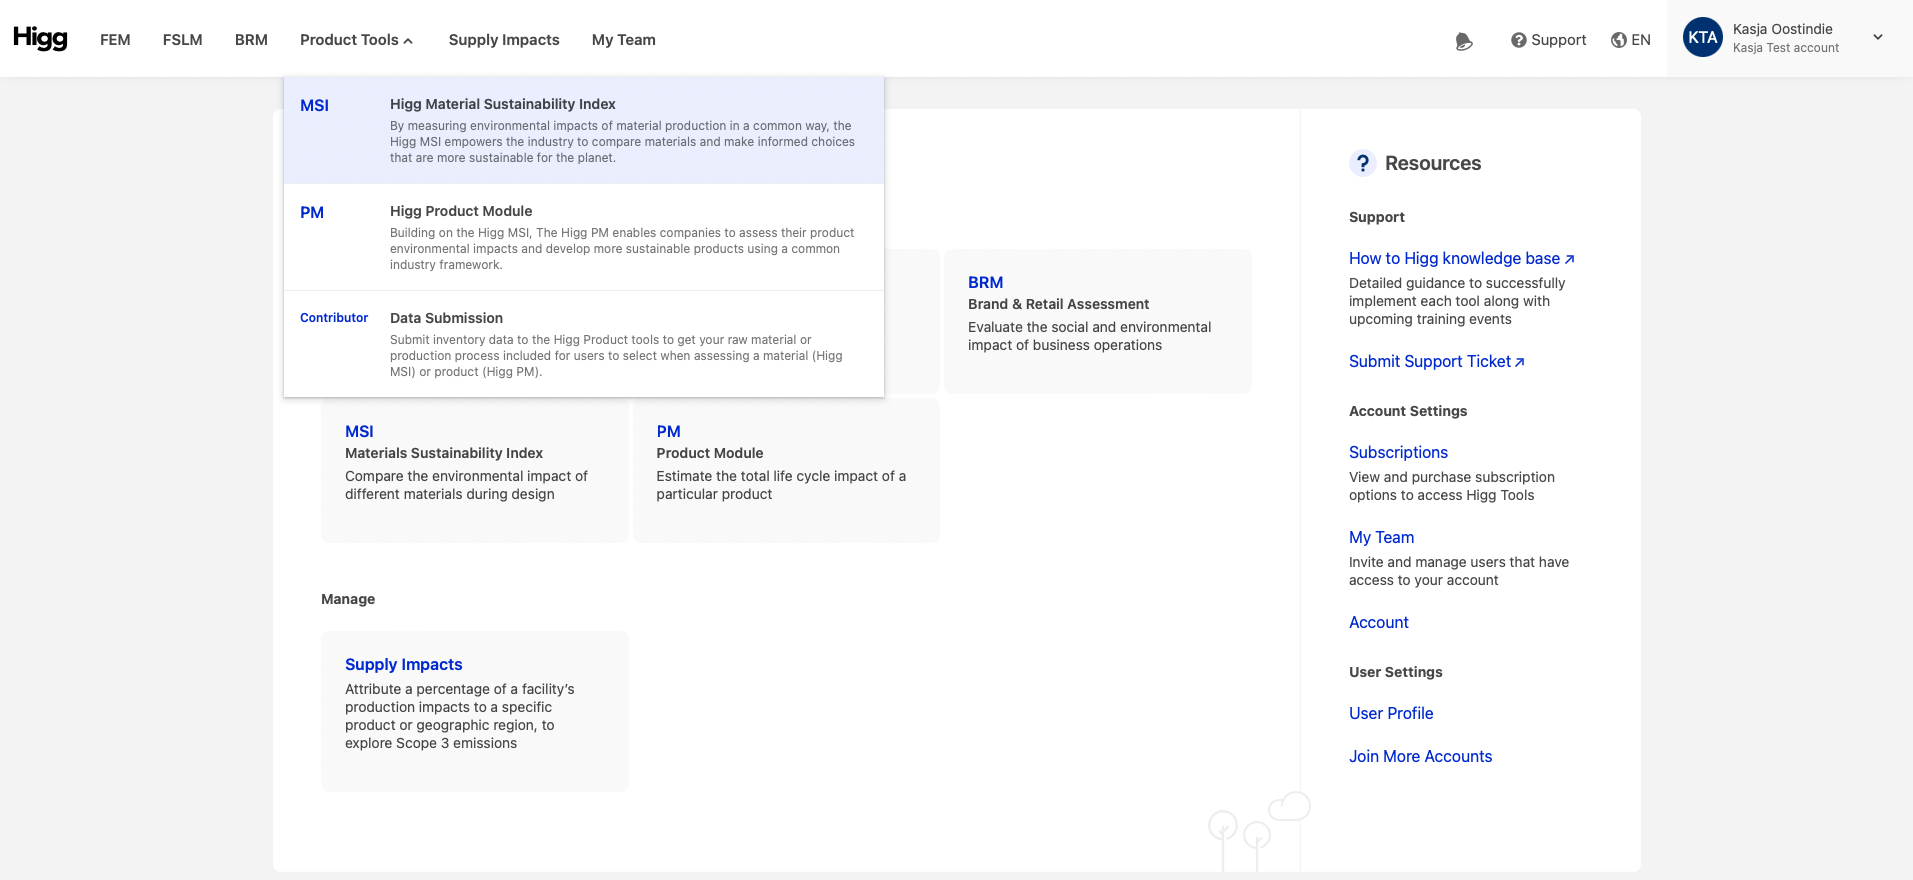
- Click on the “Product Tools” tab at the top of the page and select “MSI” or click on the “MSI” tile to navigate to the MSI dashboard
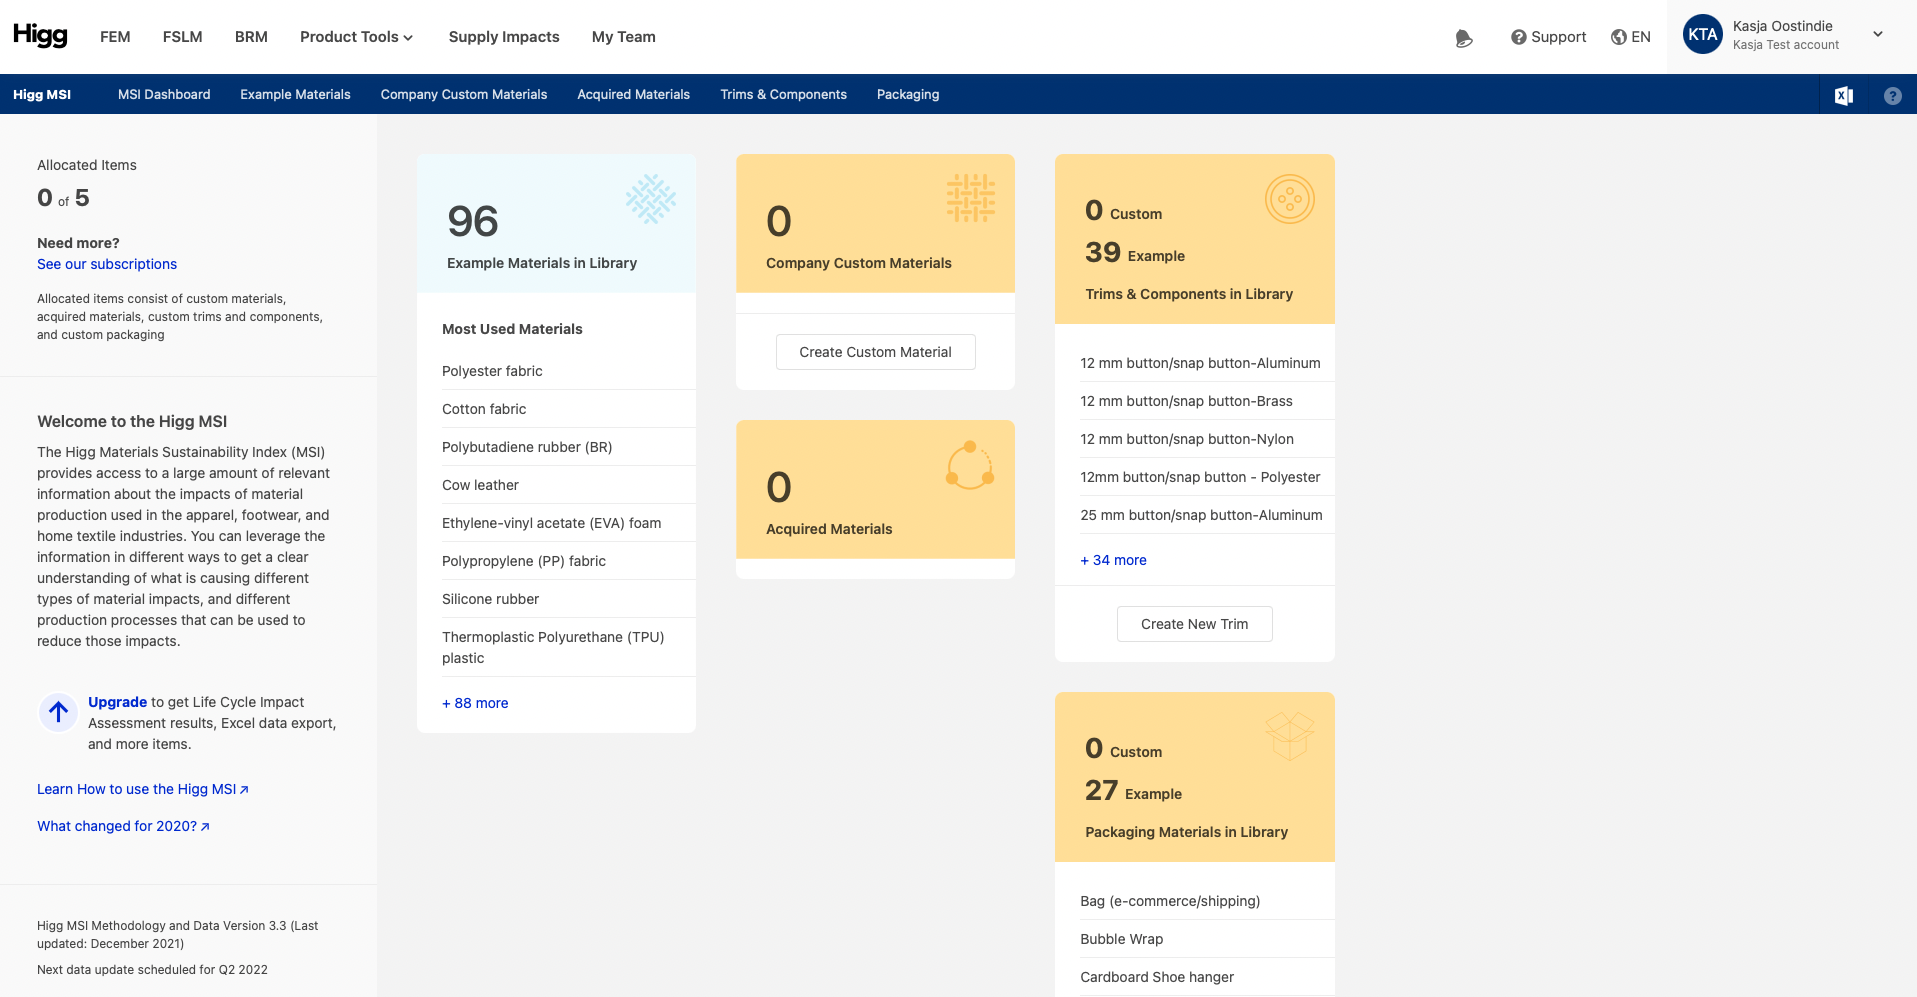
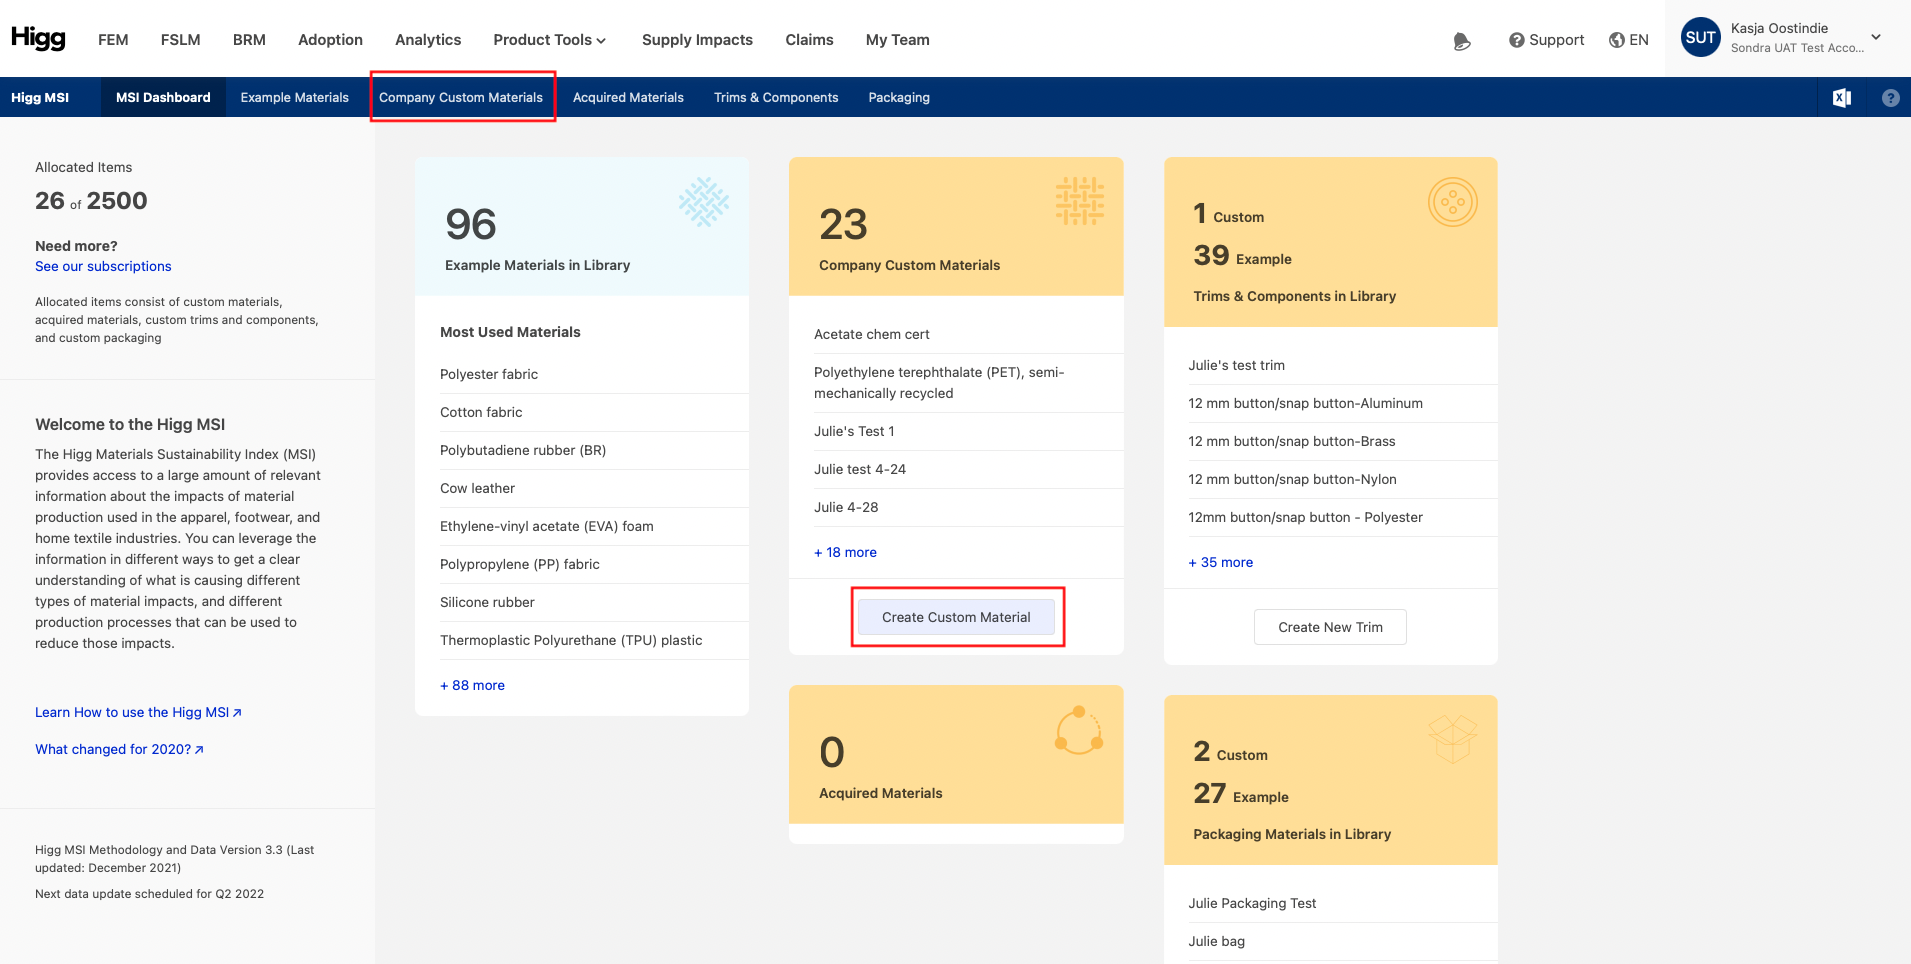
Starting from the Higg MSI dashboard, it is possible to:
- Access five material libraries:
- Example Materials Library
- Company Custom Materials Library
- Acquired Materials Library
- Trims & Components Library
- Packaging Materials Library
- View material scores
- Compare materials
- Create and save Custom Materials and material blends
- Share materials with other Higg MSI users
- Receive materials shared with by other Higg MSI users
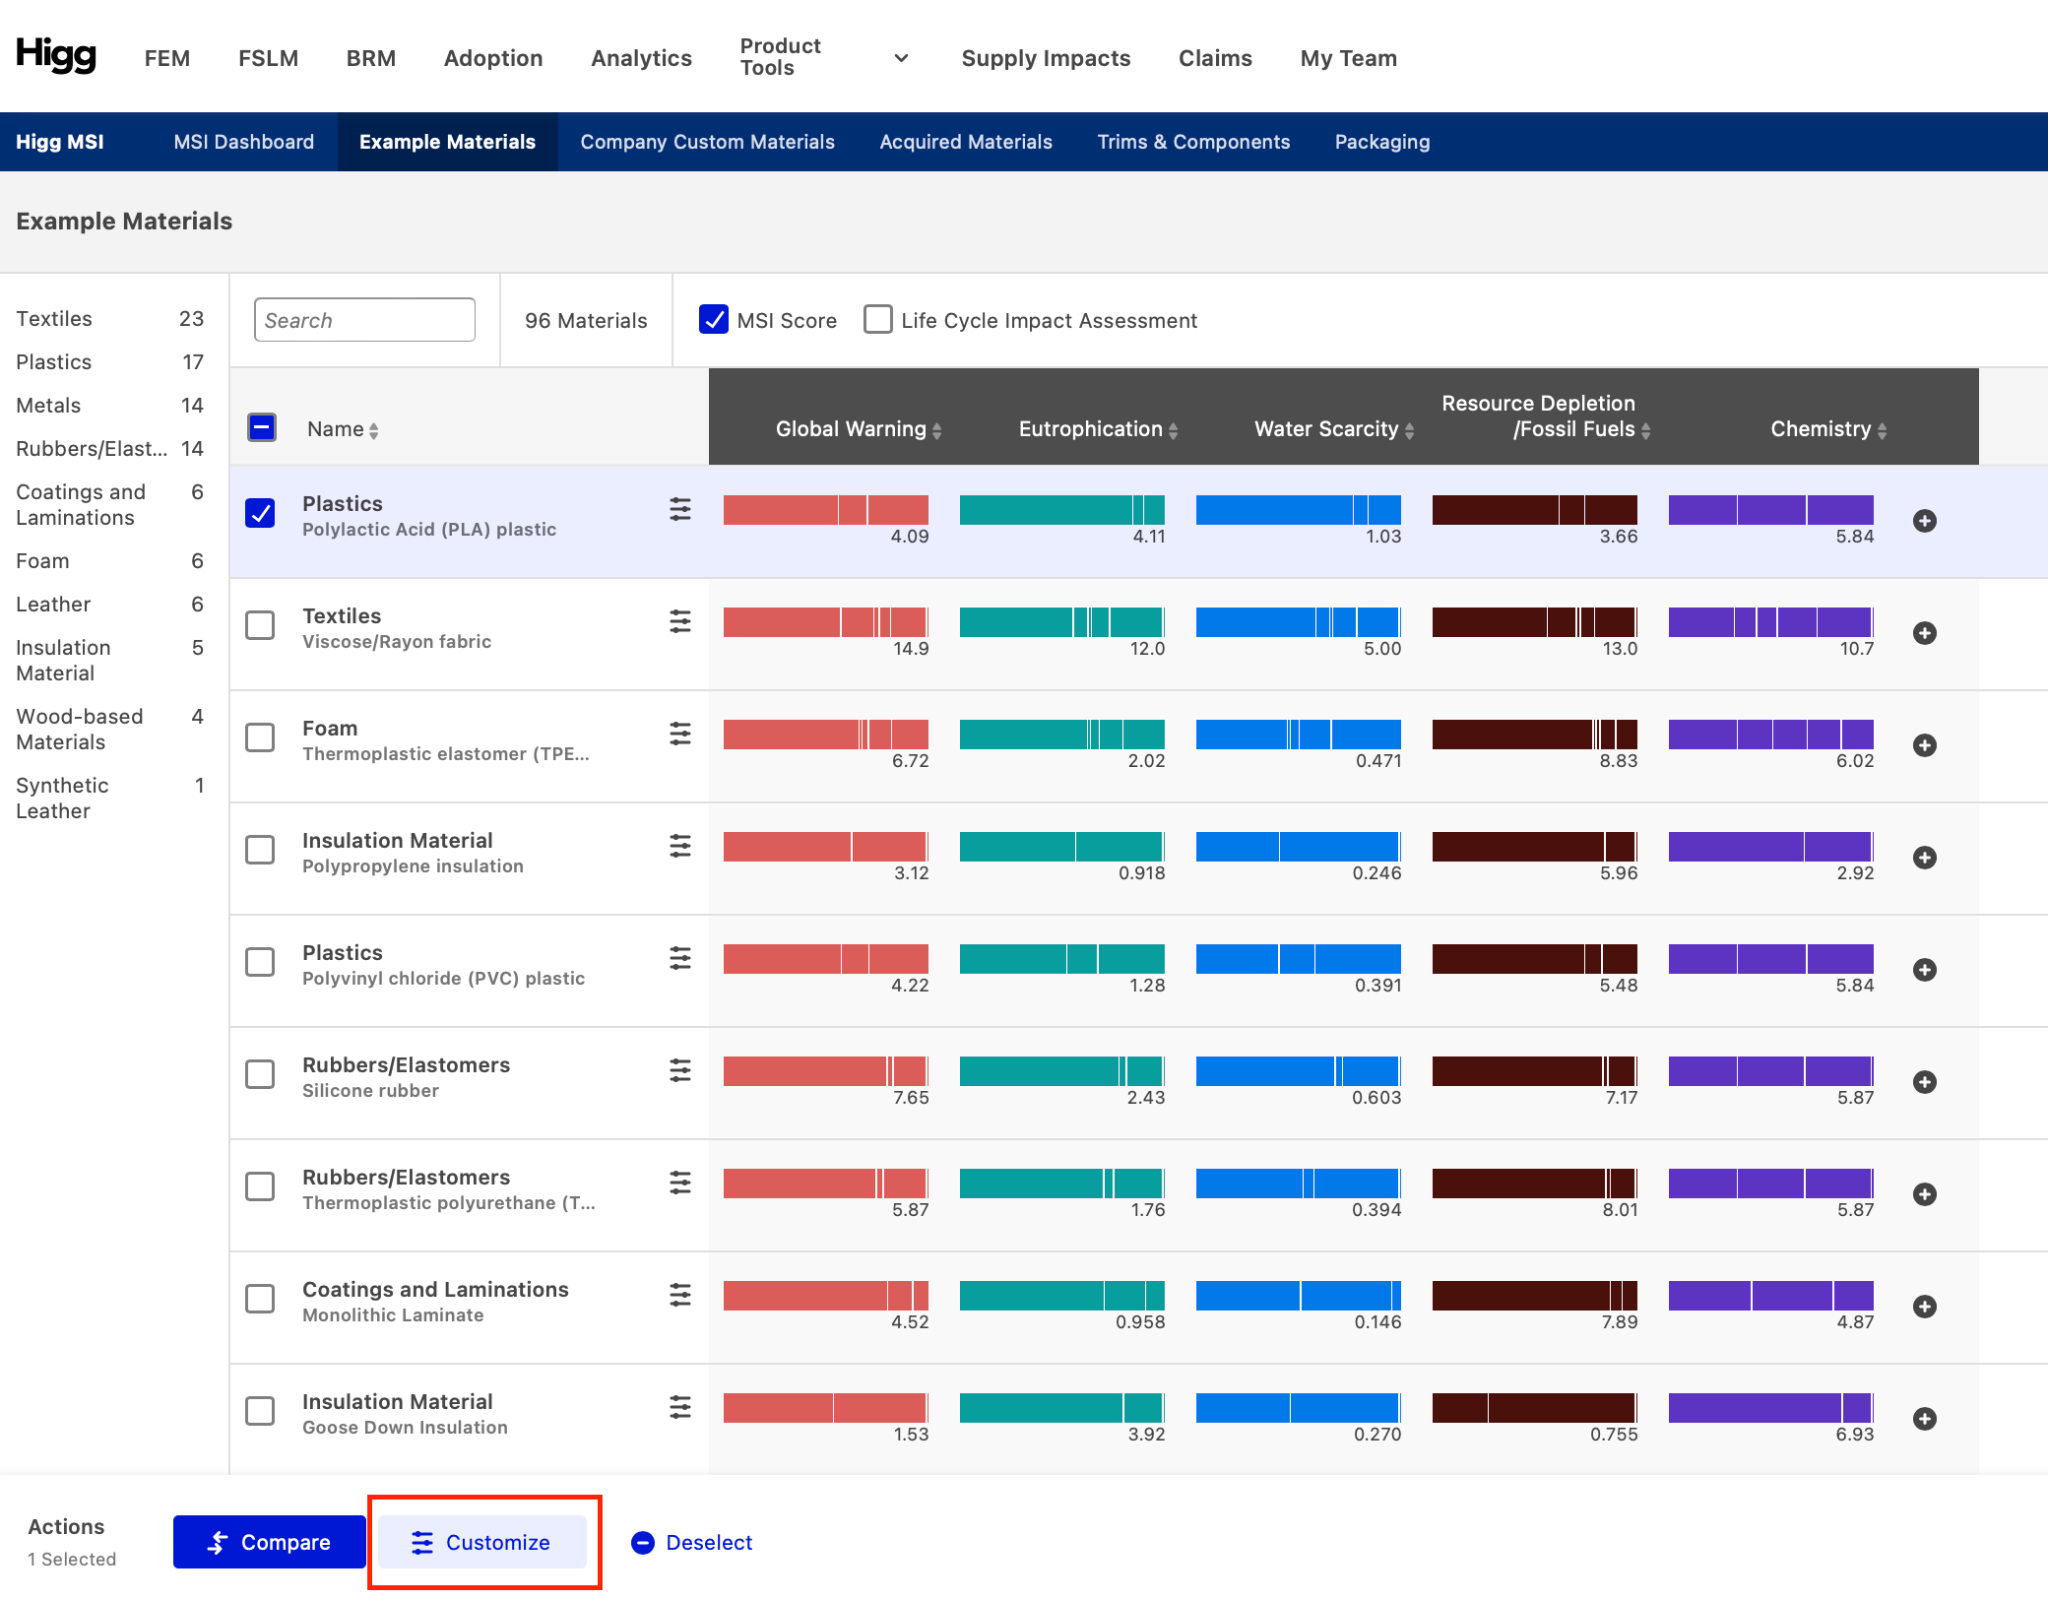
3. Example Materials
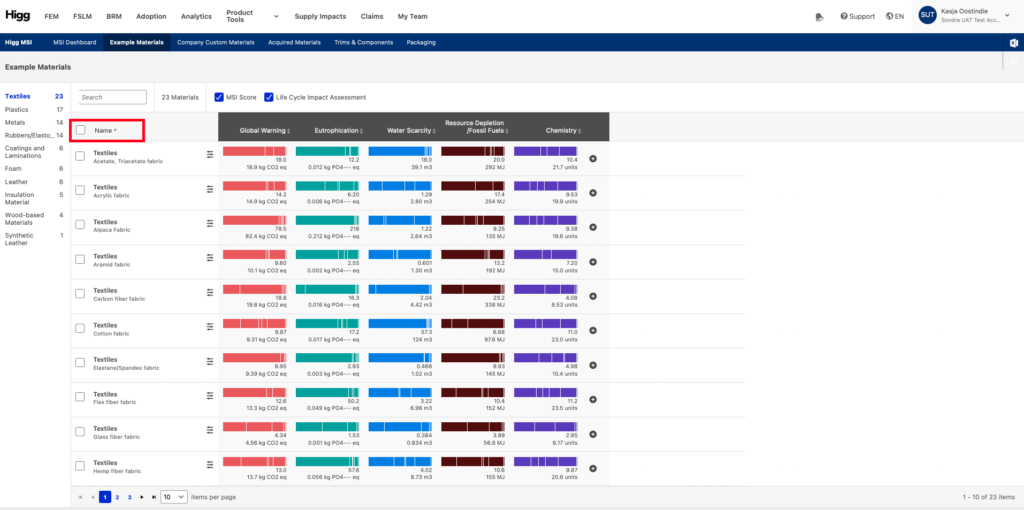
The Higg MSI Example Materials tab provides access to all available Example Materials, listed in alphabetical order within each Material Category. These Example Materials can be viewed as they are (with default processes selected) or they can be further customized.
3.1 Viewing Material Scores
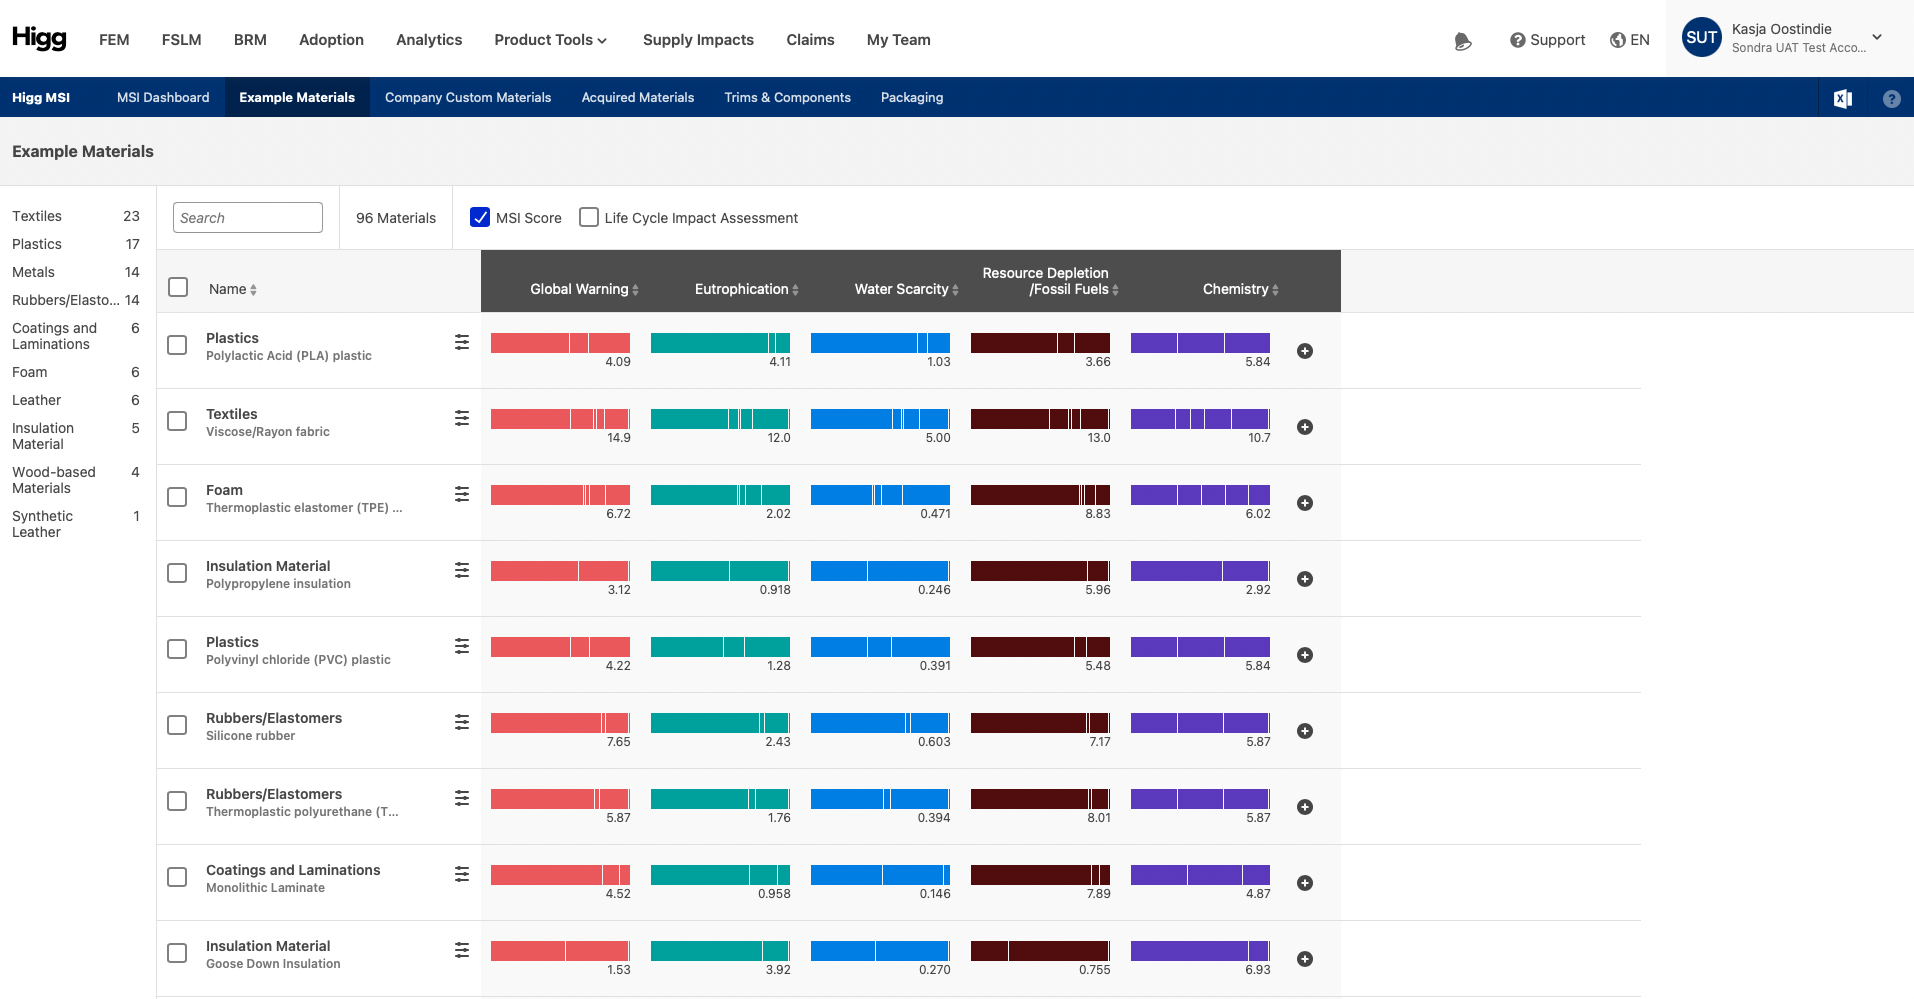
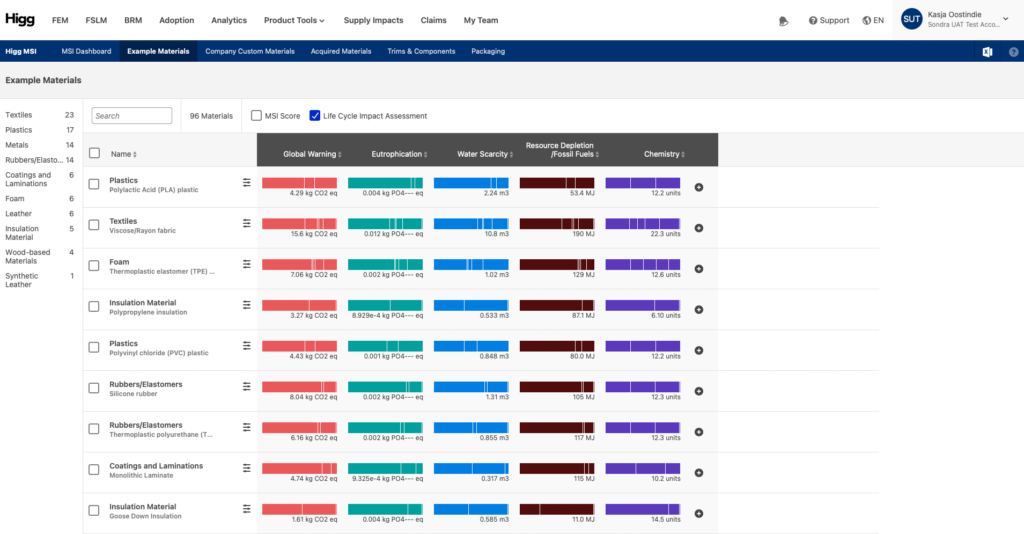
Users can assess Example Materials based on 3 different score views:
- Their MSI score. MSI scores are normalized values that help explain if an impact category LCIA result for a material is high or low. A score of 10 points represents an average impact. More information on the MSI score can be found here: https://howtohigg.org/higg-msi/faq/#section2
- Their LCIA (Life Cycle Impact Assessment), the quantitative environmental impacts calculated based on the data collected in the LCA.
- Both
Example materials – MSI score view

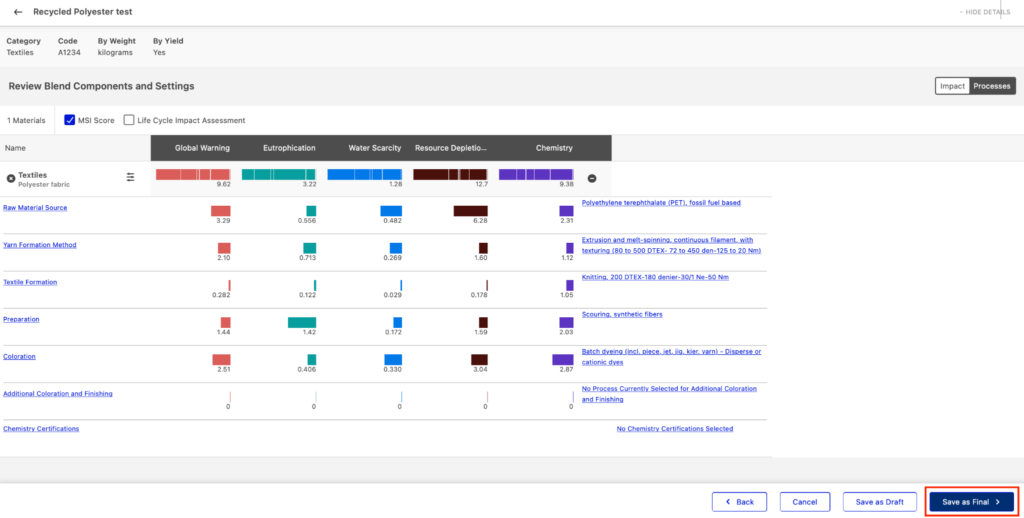
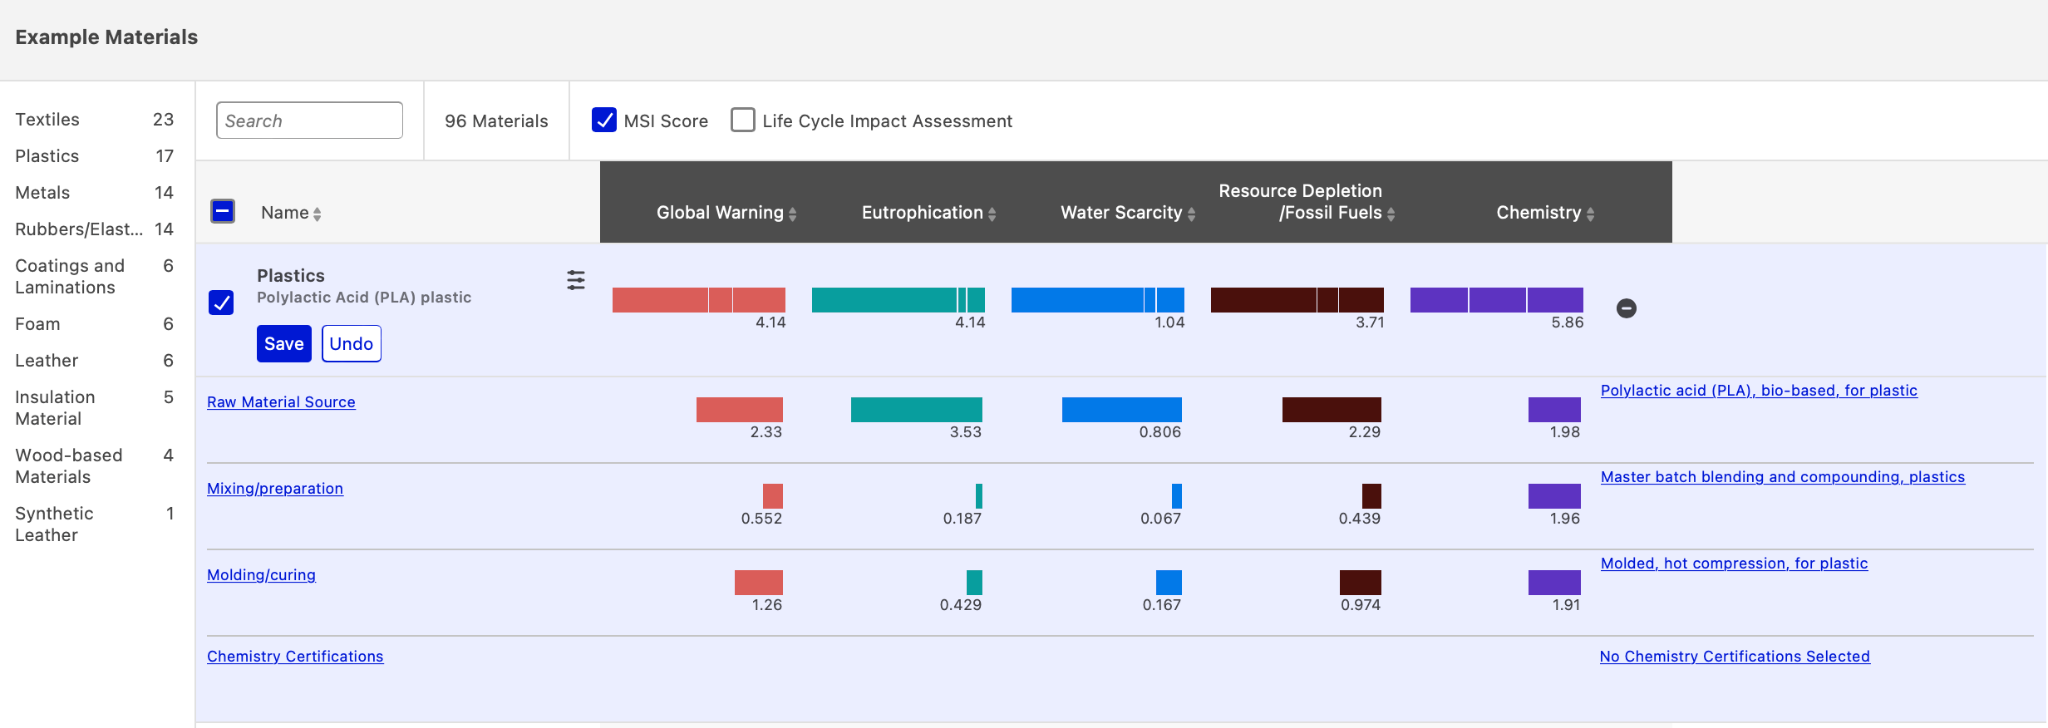
Impact bars
When hovering over the bars, you can see the impact for each stage of the production process. It shows the name of the stage and the impact that the split represents. This way it is clear to see which production step has the biggest impact for each impact category.
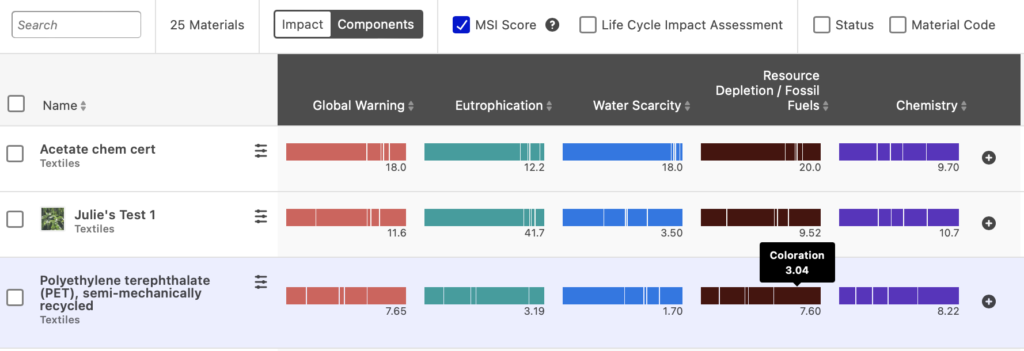
In this example you see that for this recycled polyester material, coloration has the biggest impact on fossil fuel depletion.
3.2 Searching and Sorting Materials
In the multiple material libraries (Example materials, Company Custom materials, Acquired materials, Trims & Components and Packaging), materials can be found in three ways:
- Typing into the search box
- Selecting the different Material Categories listed along the left side of the page, where they are listed alphabetically
- Clicking through the different pages of materials
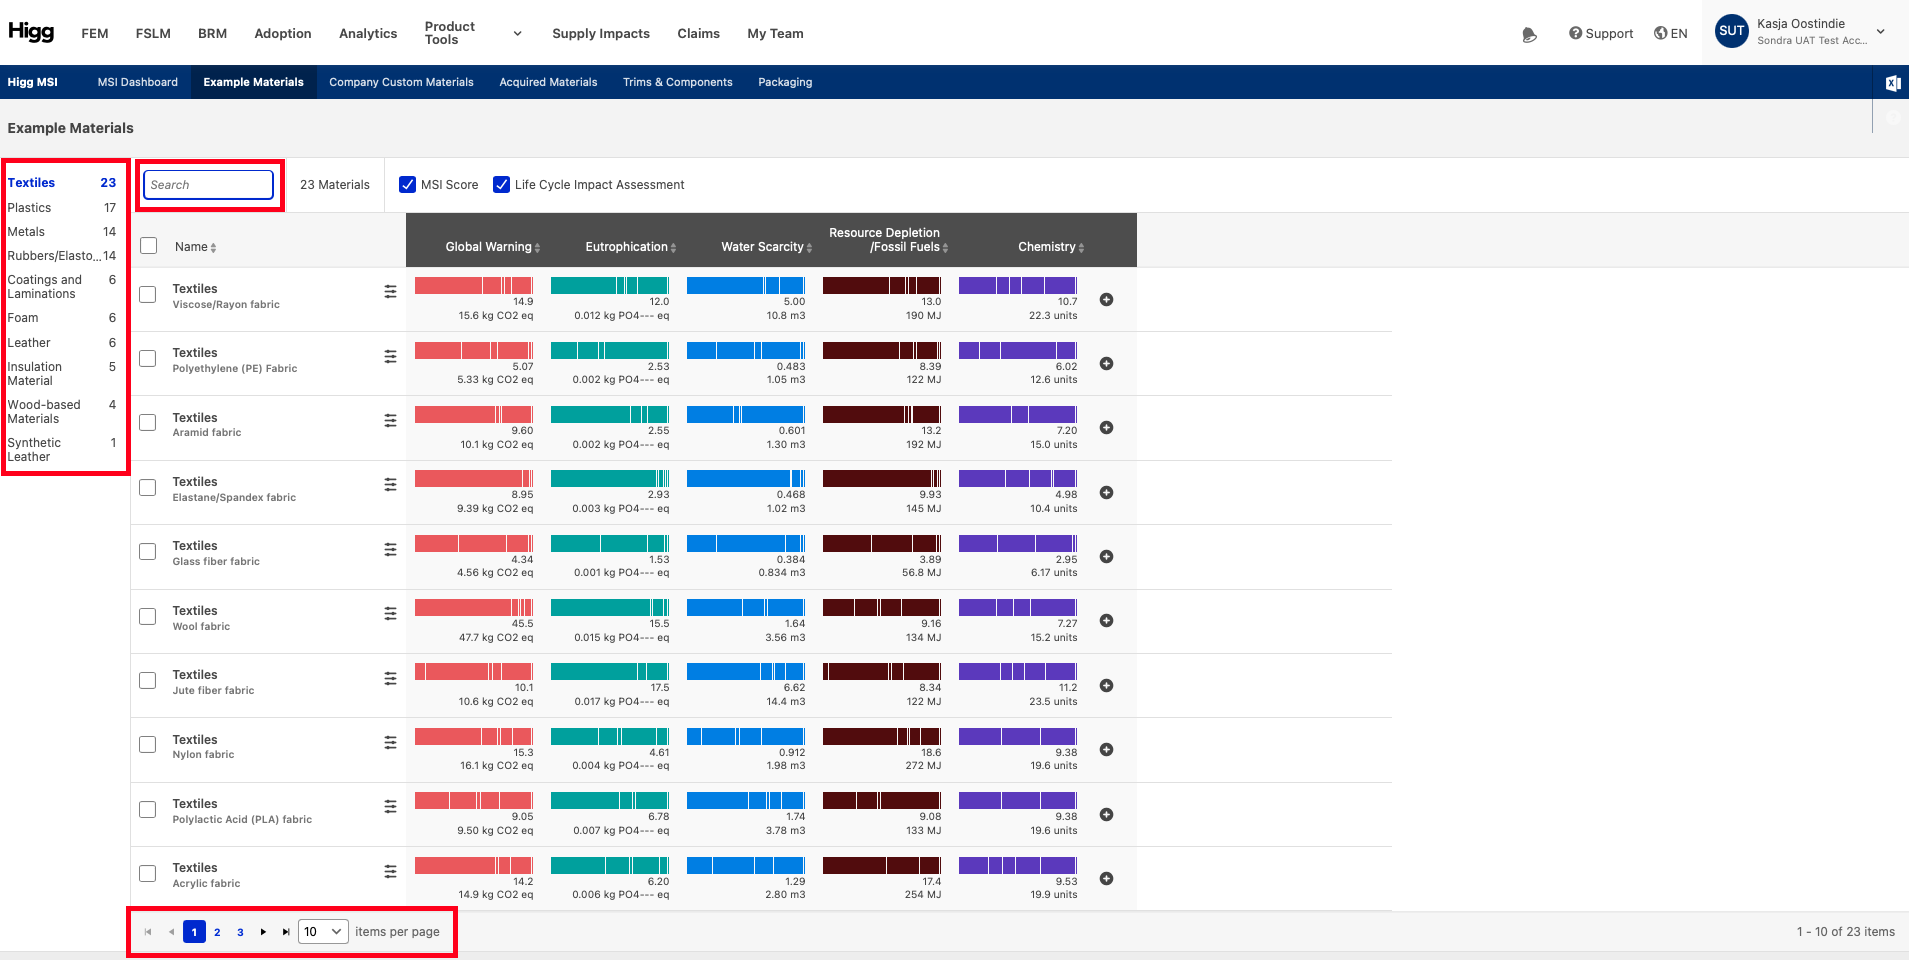
Example Materials can be sorted in two ways:
- An alphabetical view, the default (from A->Z), which can be switched to Z->A by clicking on the header ‘name’.
- The different impact indicators (Global warming, Eutrophication, Water scarcity, Resource depletion & Chemistry use), sorted from high to low or low to high by clicking on the header of the desired impact indicator.
Example Materials sorted by Alphabetical order
Materials sorted by specific impact area score

Note: The example on screen shows sorting from high to low, based on Global warming potential, also known as GWP.
4. Custom Materials
4.1 Creating a Custom Material
To create a custom material, the following steps are followed:
- Click “Create Custom Material” and enter basic information
- Select example material(s)
- Modify the processes of material
- Save custom material
Click “Create Custom Material” and enter basic information
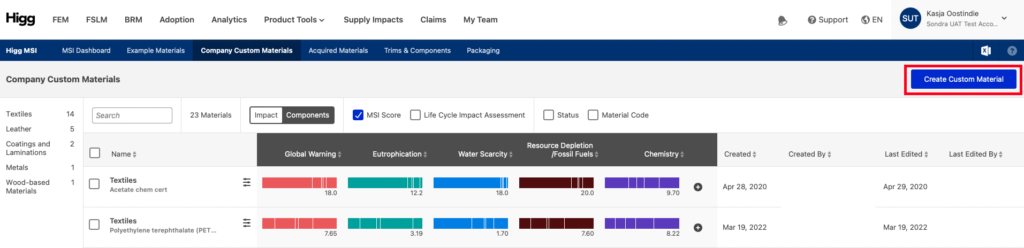
To create a Custom Material, click the ‘Create Custom Material’ button on the Higg MSI dashboard. Or navigate to ‘Company Custom materials’ and then click ‘Create Custom Material’ in the top right corner.
Create Custom material from MSI dashboard
Create Custom material from Company Custom materials-page
Clicking “Create Custom Material” will open a window where you enter information about the material. To begin the process, it is required to fill out:
- A Material Name (must be unique to prevent an error message)
- A Material Category (can only be selected from the list provided)
Please note that the material category cannot be changed after creating the material.
The following fields/options are custom:
- Material Code
- Upload image
- Unit of measurement
- Yield
The Unit of Measurement should be indicated here if you want to use a unit different from the system’s default (kg). Note: The Higg MSI will always normalize material scores to 1kg of material, even if specified otherwise at this stage. Selecting a Unit of Measurement here will update the default Units of Measurement options in Trims & Components, Packaging, and product assessments in the Higg Product Module (PM). The same is true when selecting “Yield” at this stage. If you wish to use Yields for Trims & Components, Packaging, and product assessments in the Higg Product Module (PM), you must specify the material’s yield conversion to 1 kg of material here.
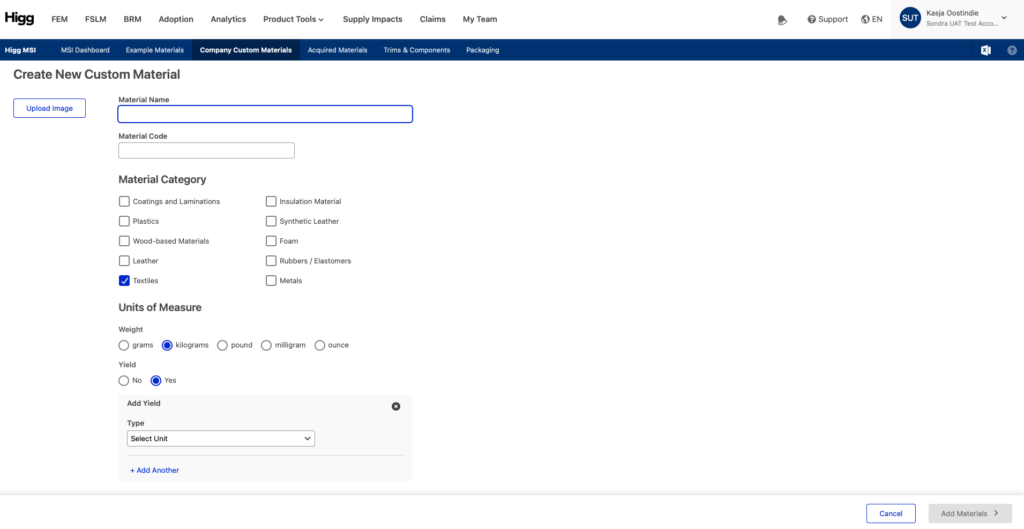
Next, select “Add Materials” in the bottom right corner of the screen. This button will only be activated once a Material Name and a Material Category have been selected.
Select example material(s)
On the following page, select the material to be customized by searching from the Example Materials Library, the Company Custom Materials Library, or the Acquired Materials Library.
Select the materials for the custom material. The materials that are added together should make up 100%. Until materials are added and 100% is reached, there will be a pop-up in red on the bottom of the page “This blend cannot be Saved as Final because the composition values specified are less than 100%”.
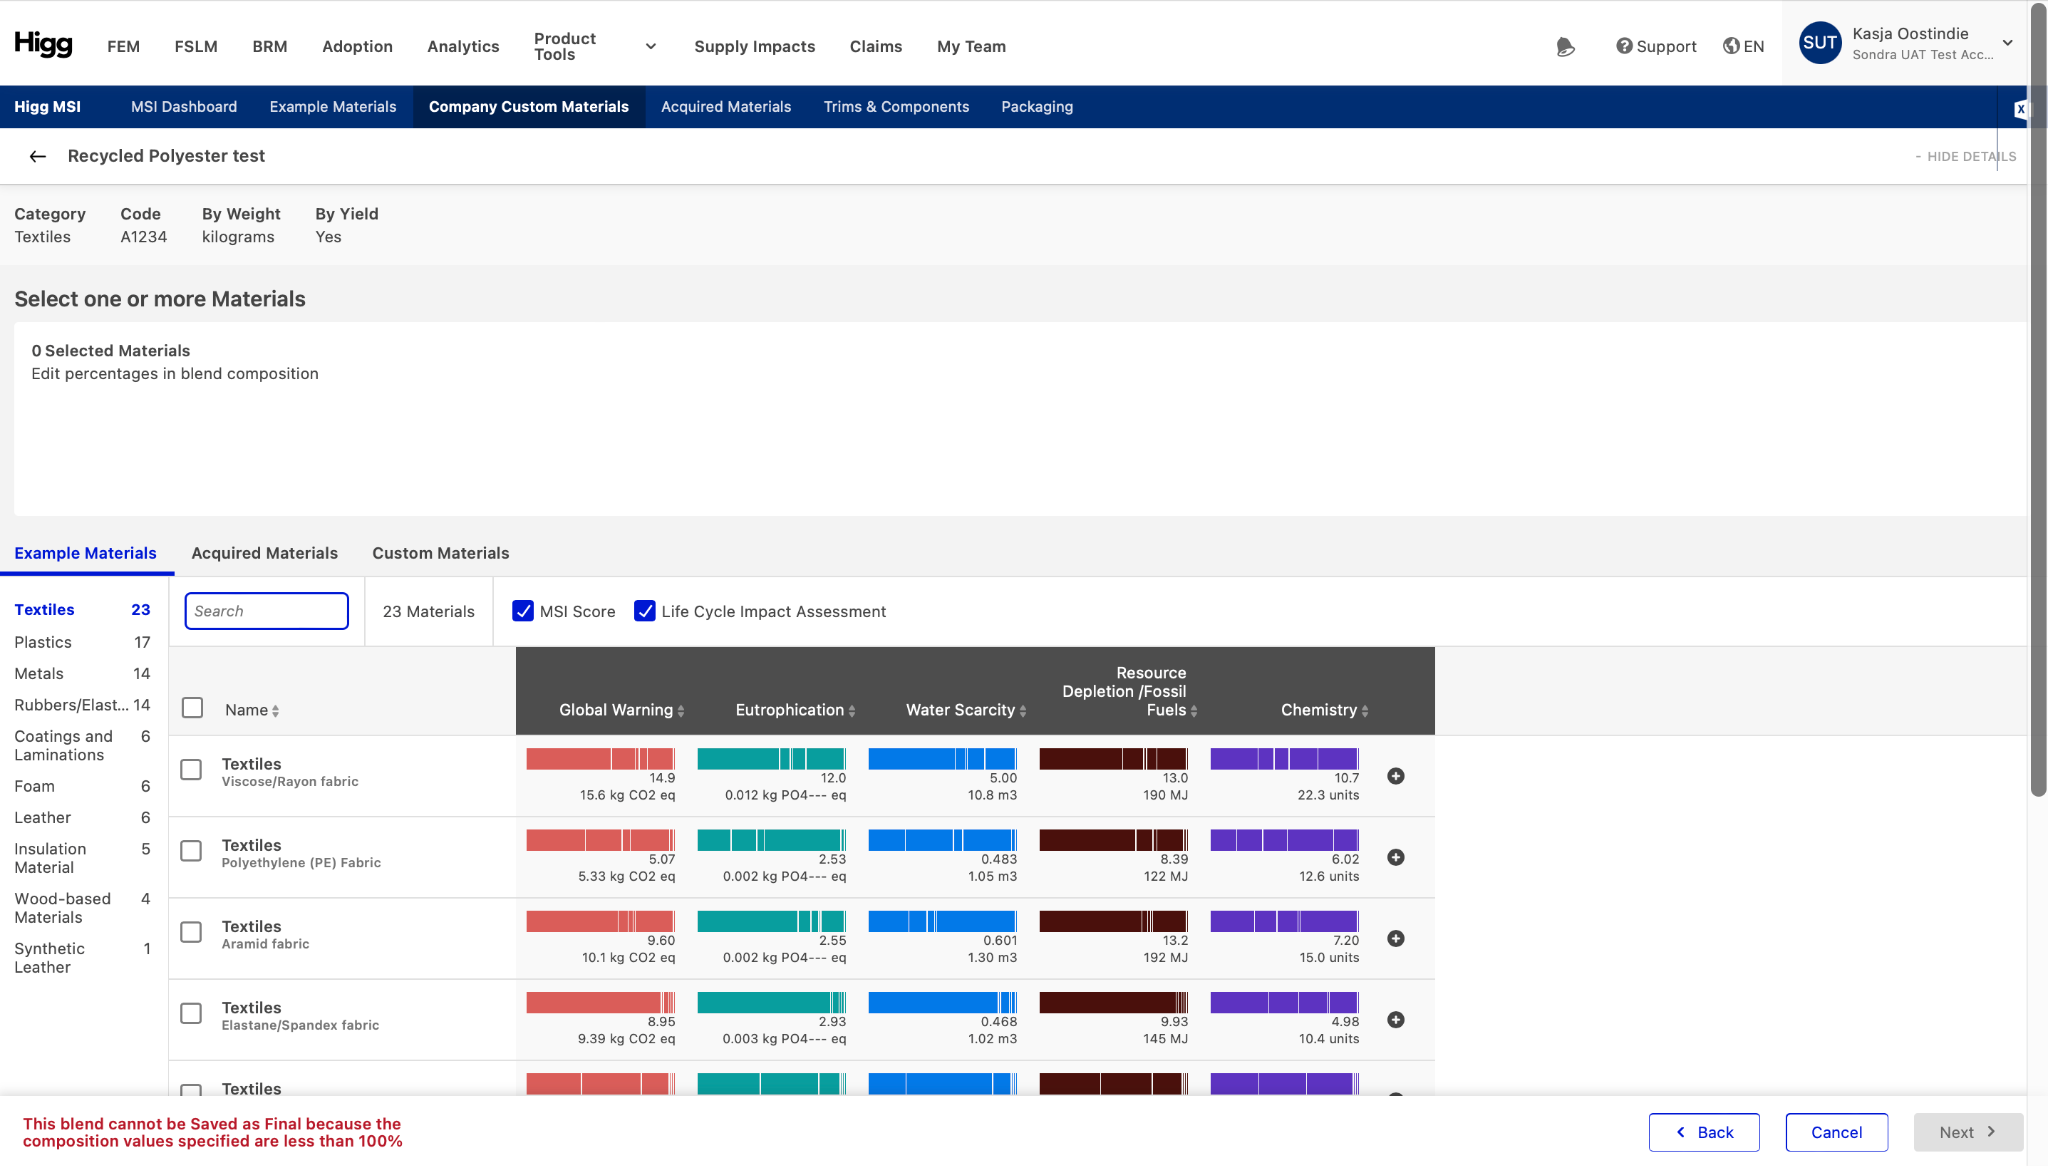
Once the correct material has been selected, click on “next” in the bottom right corner of the screen.
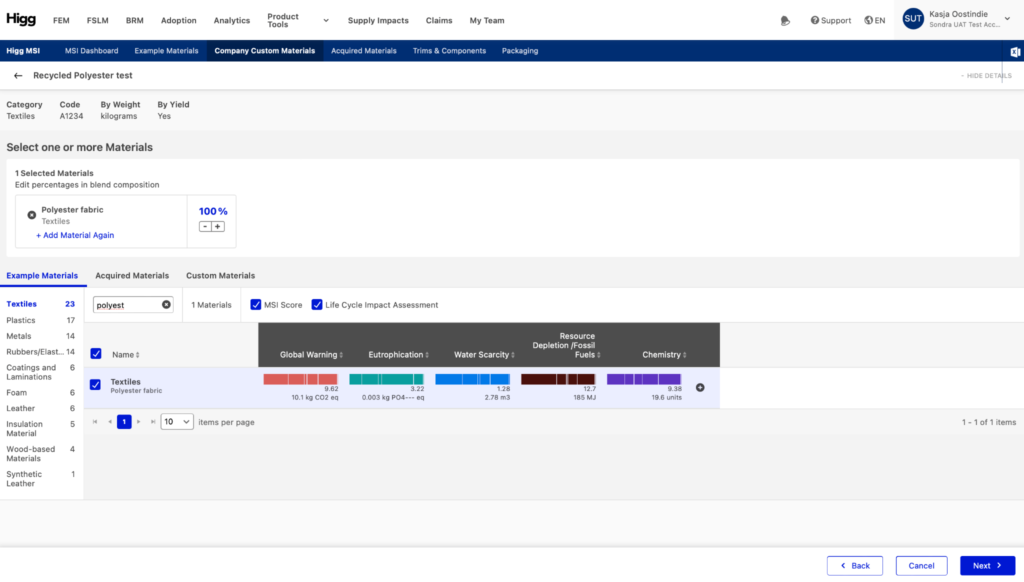
Modify the processes of material
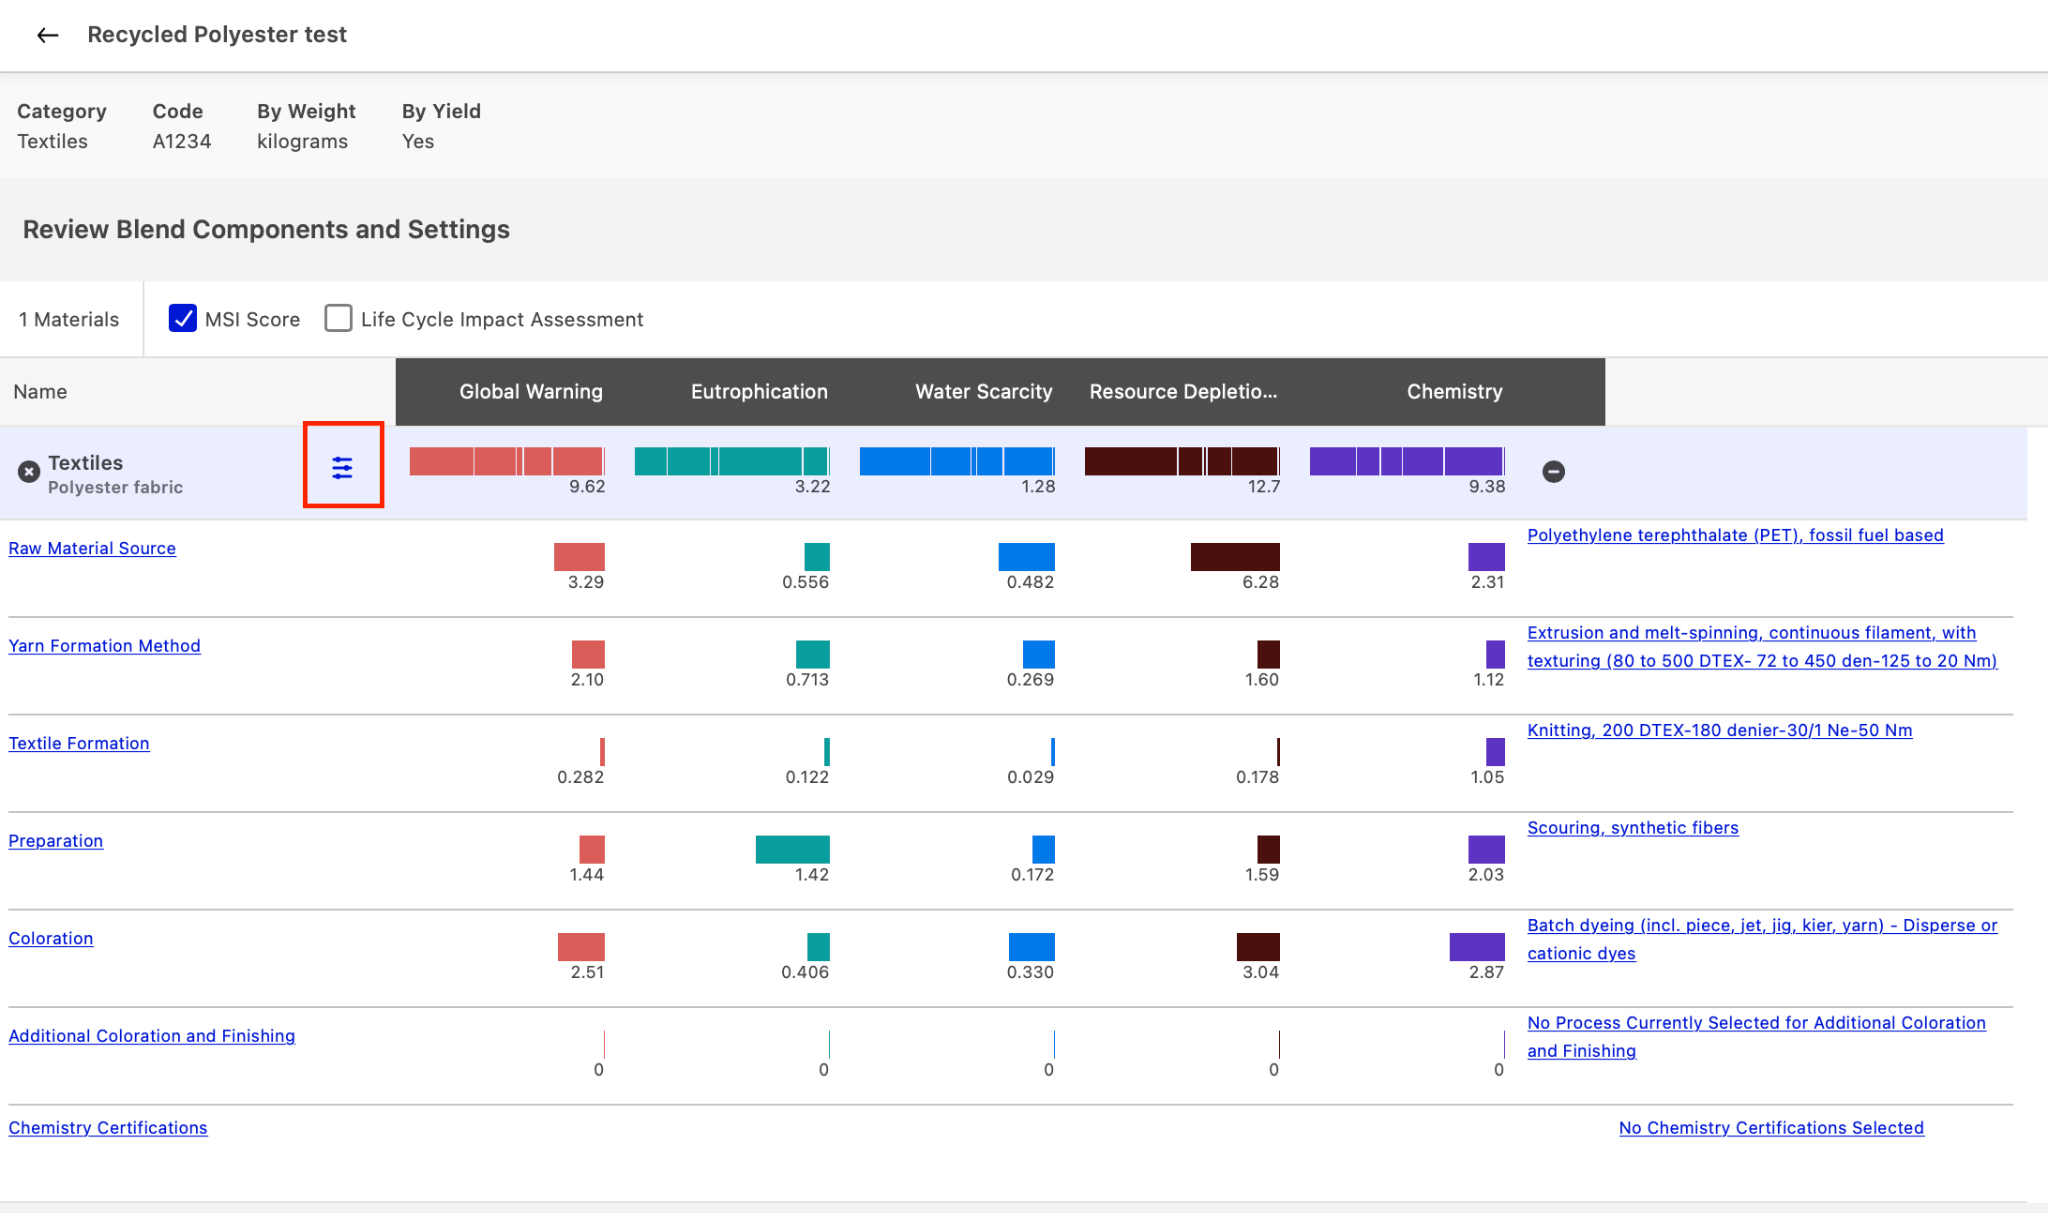
On the materials review page, clicking on the plus (“+”) sign at the right-side end of the material impact data row will activate the drop-down menu, which opens the list of processes available to be customized for that material.
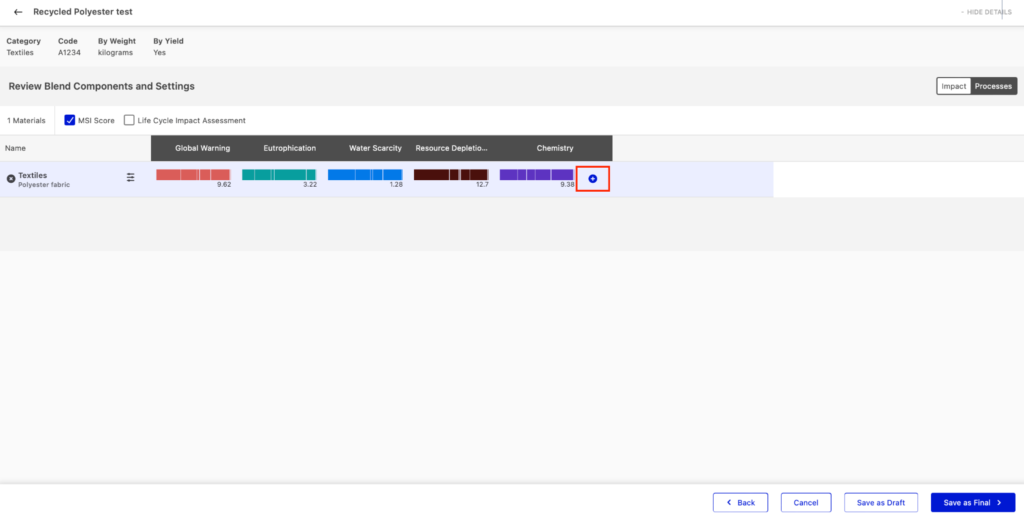
To adjust different manufacturing processes, click on the appropriate step to customize. Click the processes in both the left column and the right column, this opens the same window. As a material is customized, its score will automatically update to reflect the modifications.
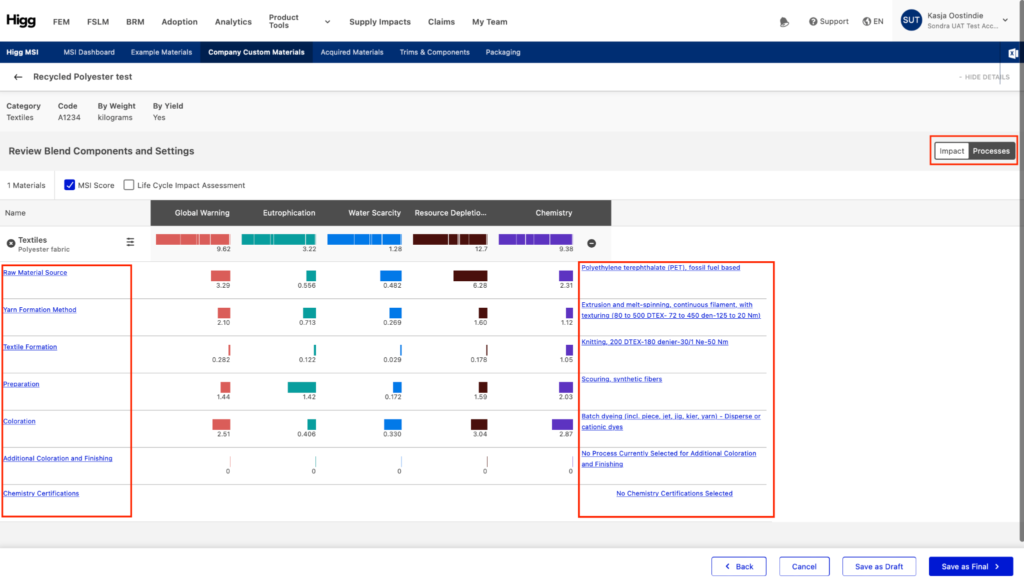
On the right, you can select “impact” or “process”. These are two different views of the editing mode. By selecting “process”, the impact-window will be hidden.
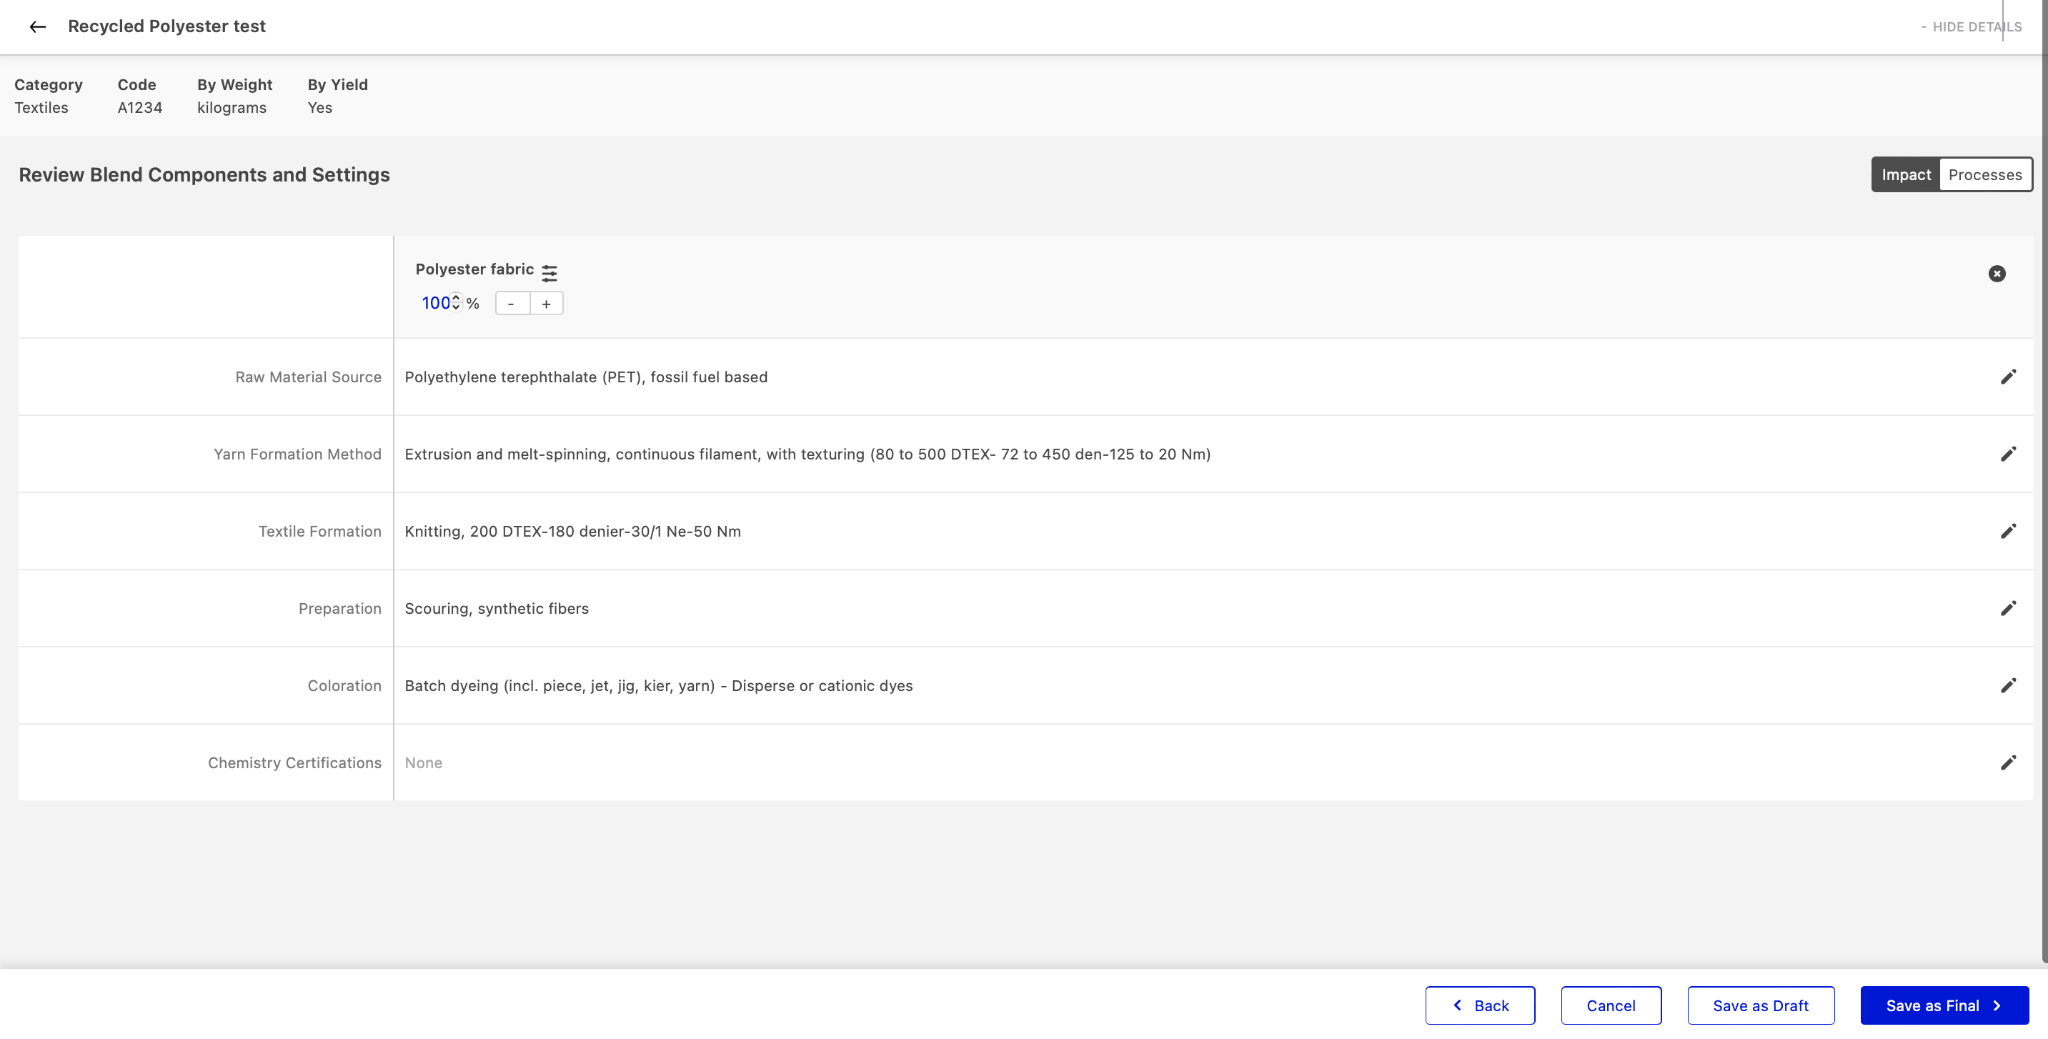
Next, choose the appropriate process to replace the default process used in the Example Material. Repeat this for every step. It is possible to select multiple processes at each step.
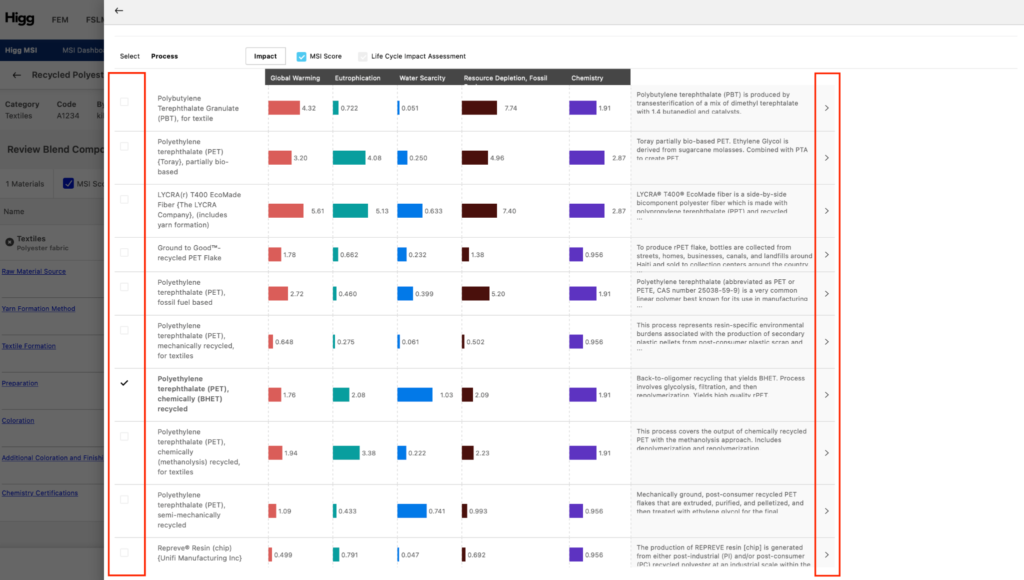
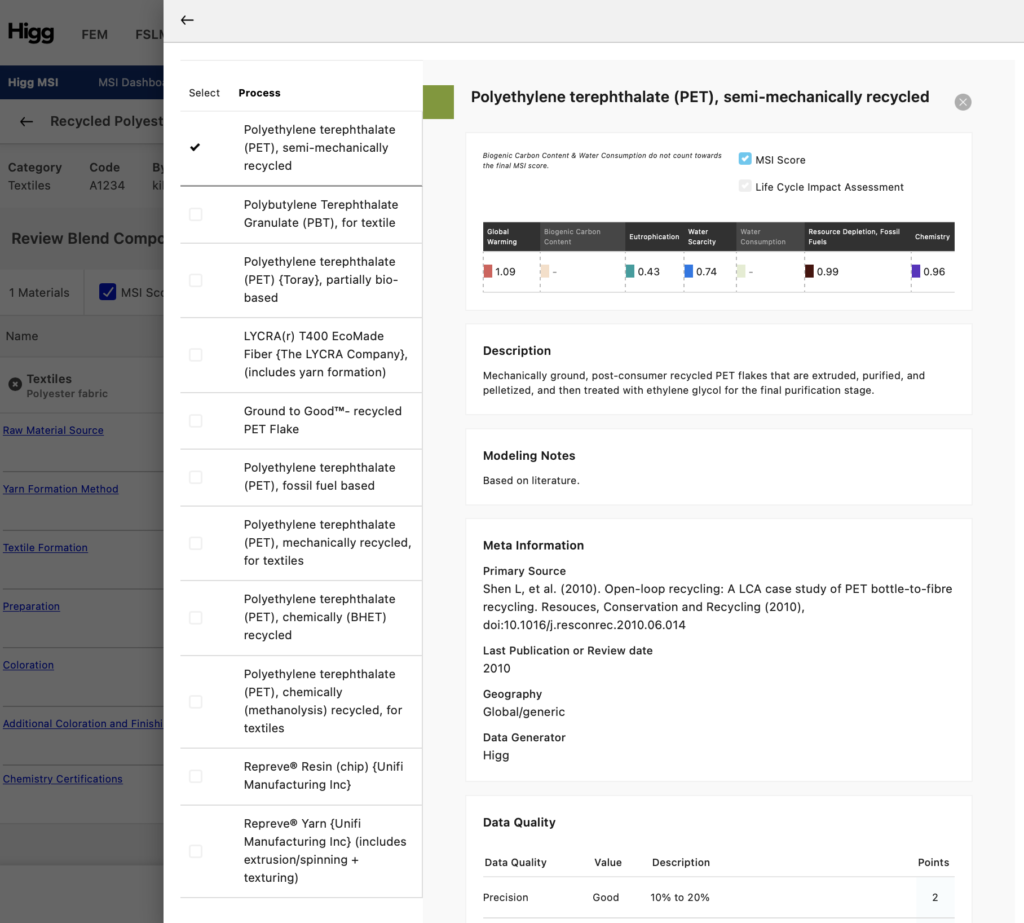
Accessing metadata of process impacts
For a better understanding of each manufacturing process, hovering over each process description will reveal a complete description. For more details on the selected process and access to the process metadata, click on the carrot (“>”) sign on the right-hand side of the process description.
Save custom material
To save the material, click “Save as Final”.
Other pathways to start customizing a material
It is also possible to start creating a custom material from the Example Material Library overview. There are two ways to do this. The first option is to click “customize material on the bottom of the window after selecting the example material.
The second way is to click the plus (“+”) sign on the right-hand side of the window and start adjusting the different processes. Once all applicable processes are selected, click “save”. This opens the page where details such as name and category of the material can be entered. Click “add materials”, if no other materials have to be added to the material choose “next”, and if no other processes need to be selected click “save as final”, to save the material.
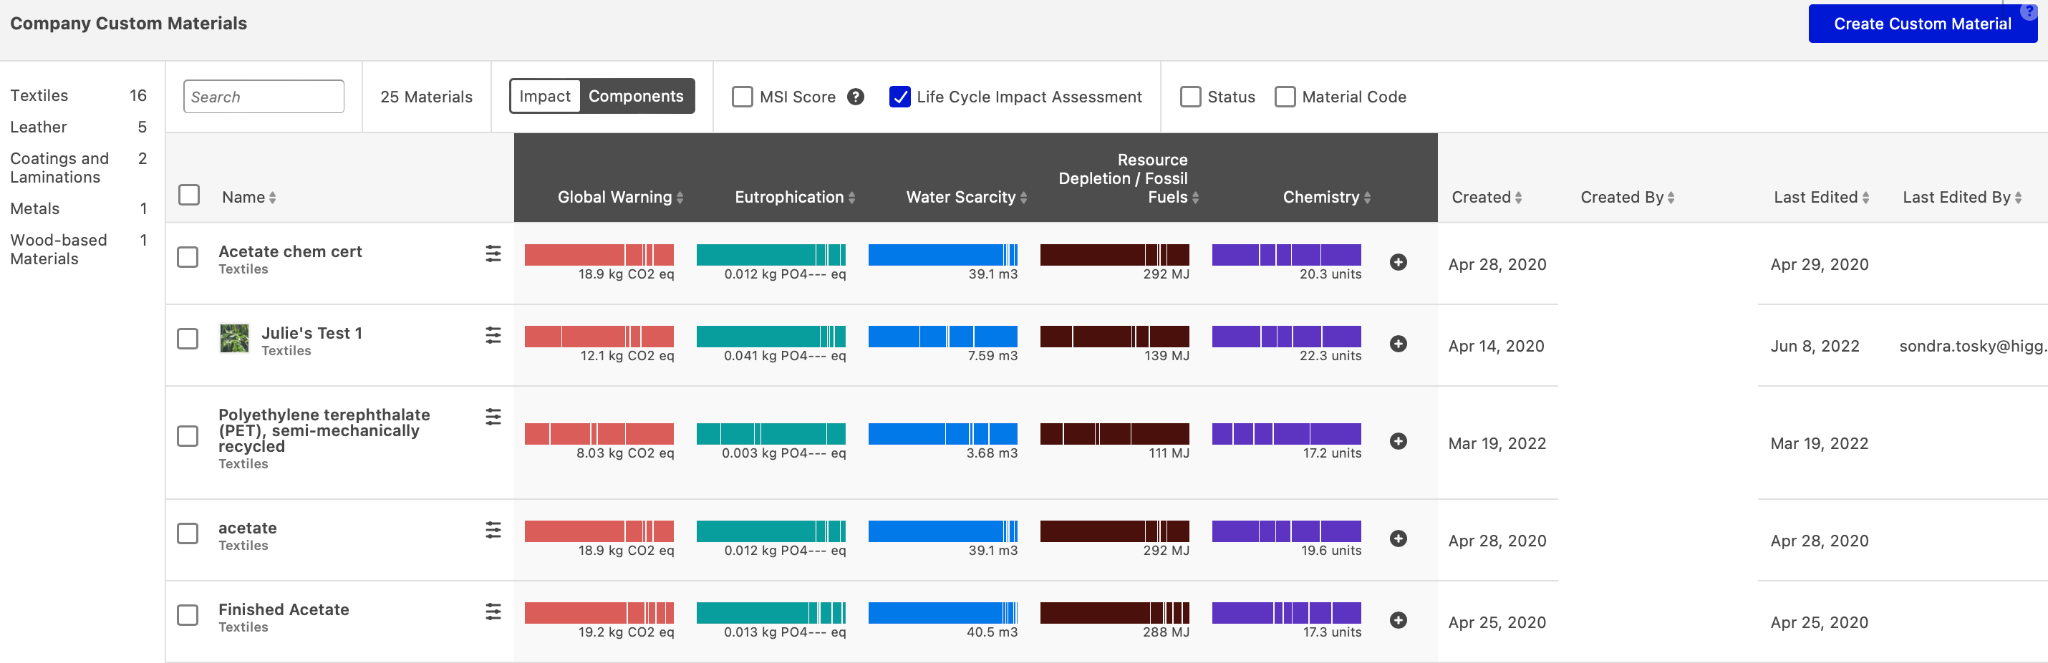
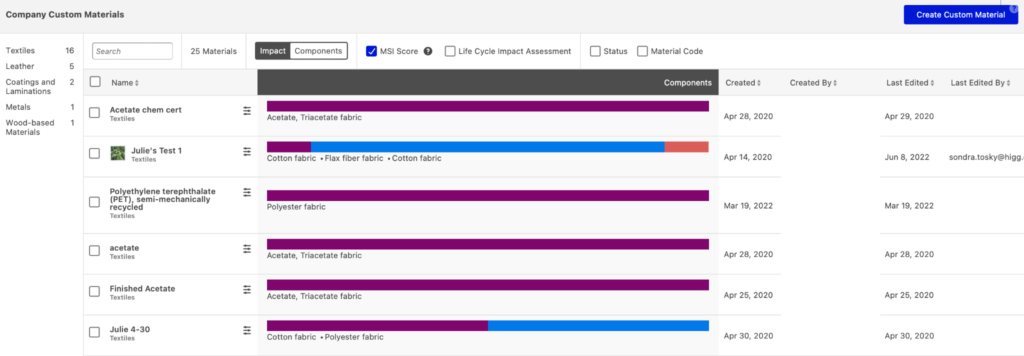
4.2 Company Custom Materials Library
The Company Custom Materials Library has different views. Click on of the following buttons or tick the boxes in the ribbon to change views:
- Impact or Components
- MSI score and/or Life Cycle Impact Assessment
Impact / LCIA-view
Component-view
The component-view shows the material composition of blends.
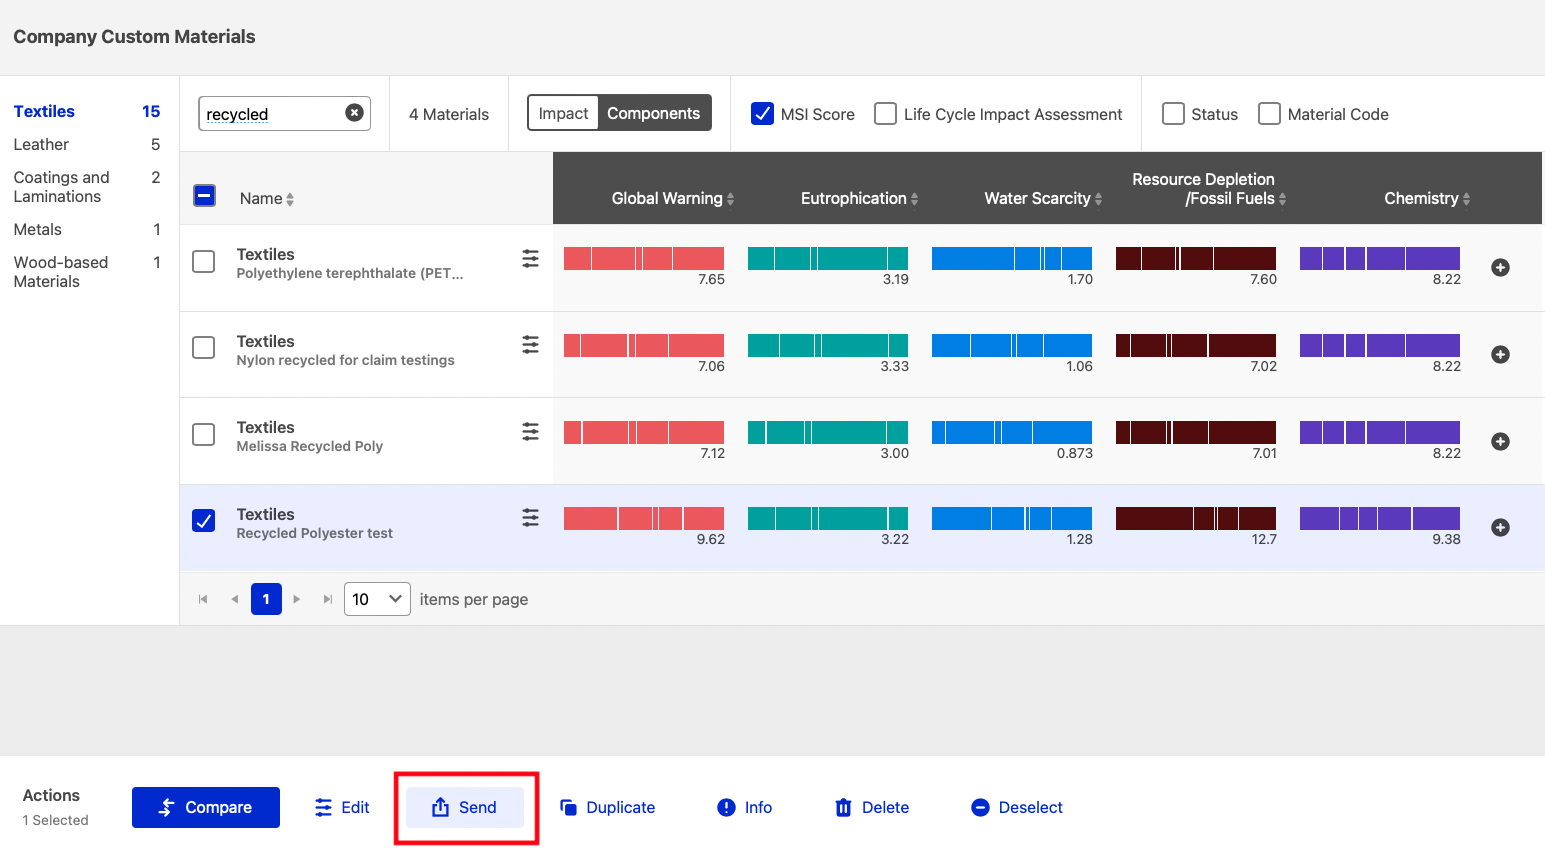
There are different actions available when selecting a custom material in the Company Custom Materials Library:
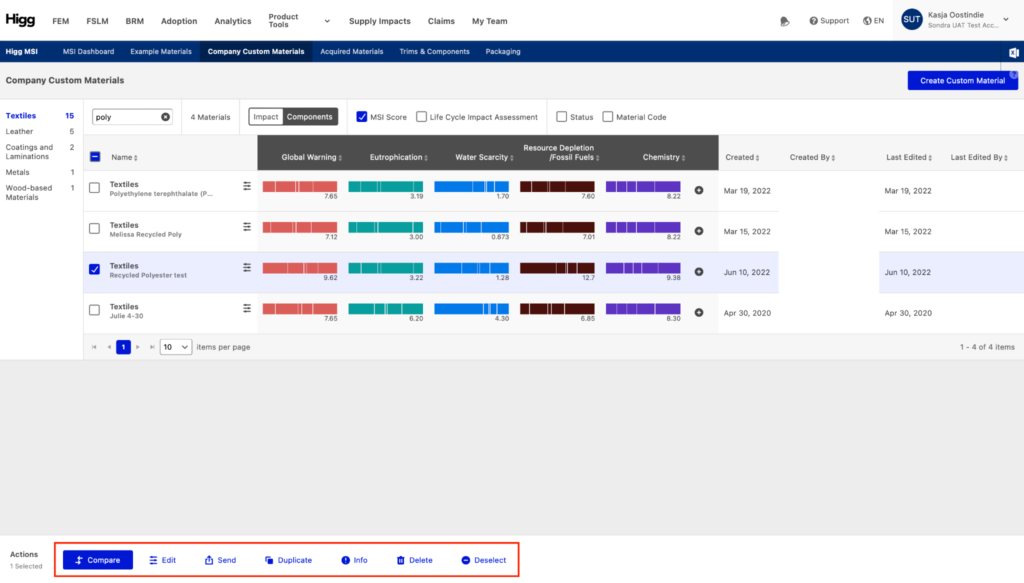
- Compare (section 7).
- Click ‘edit’ to modify the custom material.
- Send (section 5).
- Click ‘duplicate’ to create a copy of the custom material.
- Click ‘info’ to switch views. The info-view shows basic information on the material and the blend-percentages.
- Click to delete the material.
- Click to deselect the material.
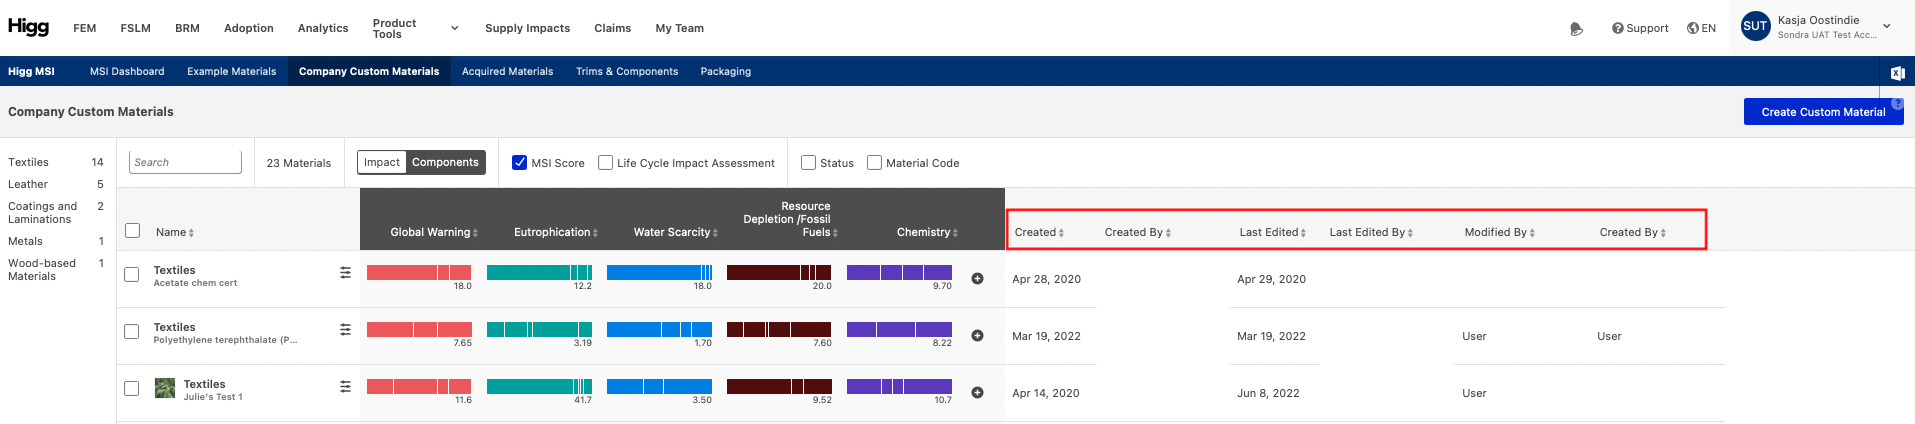
Sorting
Company Custom materials can be sorted on:
- Date created
- Created by
- Last edited
- Modified by
- Created by
4.3 Additional Process Options
Materials can be further customized using “Additional Process Options,” which includes:
- Loss Rates related to each process
- Inbound Transport Distance between processing steps
- Transportation Mode
- Chemistry Certifications
The “Additional Process Options” can be accessed by selecting the button next to the name of the material.
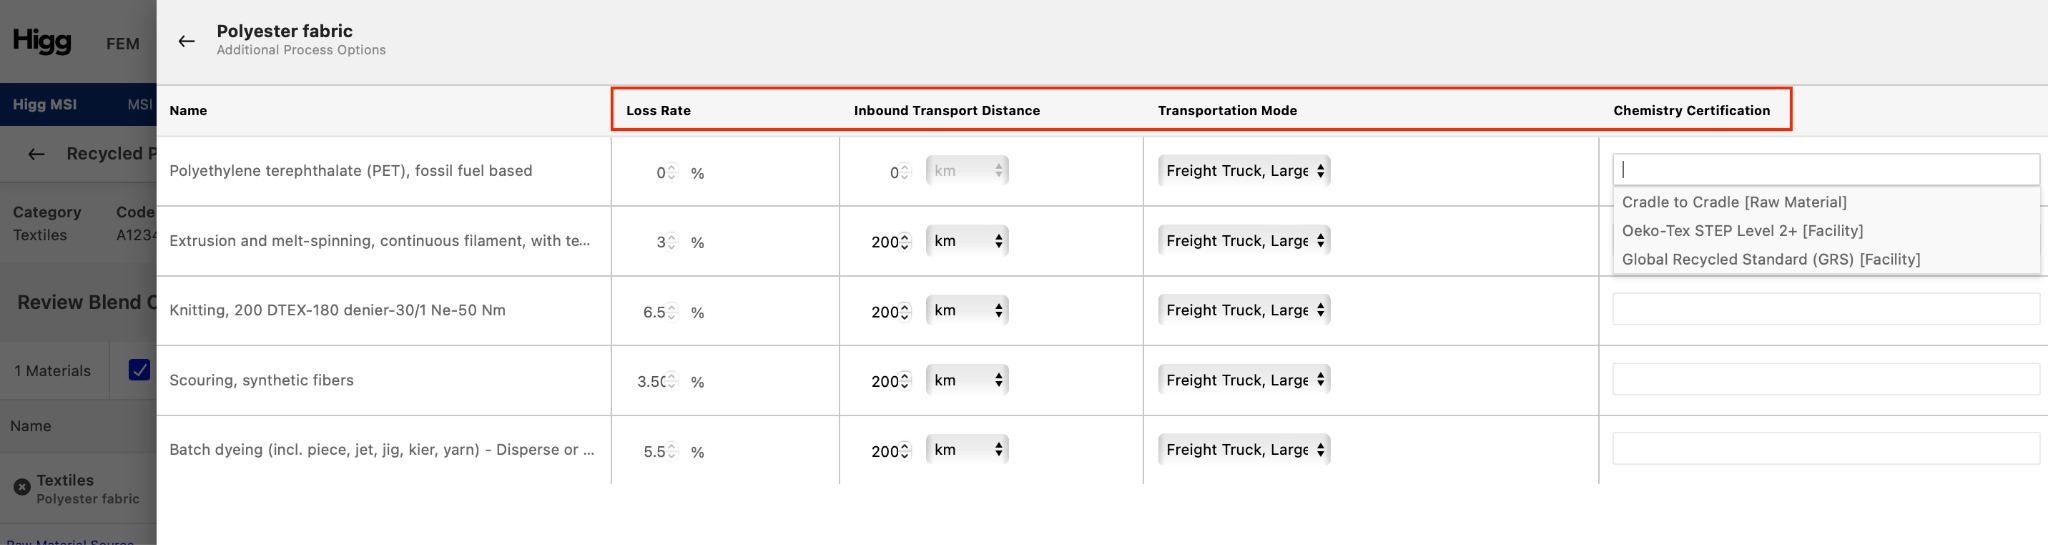
Note: Customization at this level applies at a process level, not a material level. Users are encouraged to specify these additional process steps only if they have access to the supporting data. If that data is not available, use the default data that has already been entered.
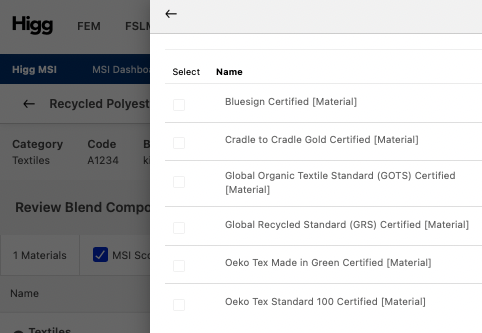
4.4 Chemistry Certifications
Chemistry certifications can be applied either at the material level, through the material customization view or at the process level in the Additional Process Options window (see section 3.2).
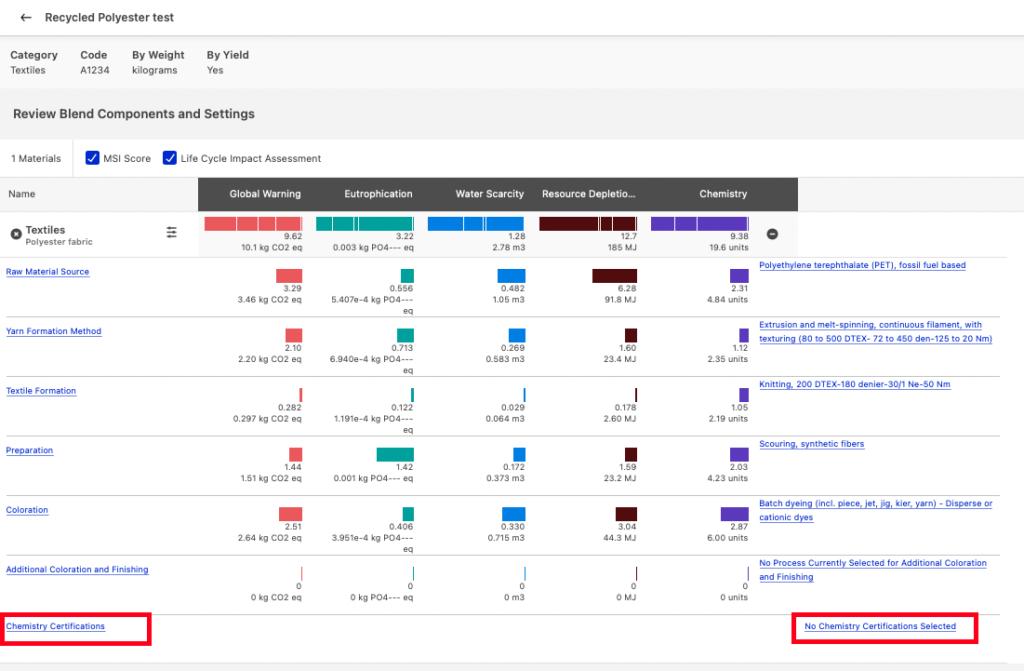
Customizing Chemistry Certifications: Material Level
When customizing a material, click on “Chemistry Certifications” in the list of processes, then select the appropriate certification from the list.
Note: Adding a chemistry certification at the material level will apply to all applicable processes related to the customized material. However, adding a chemistry certification at the process level, as described in the following example, will only apply the chemistry certification to the Additional Process Option selected.
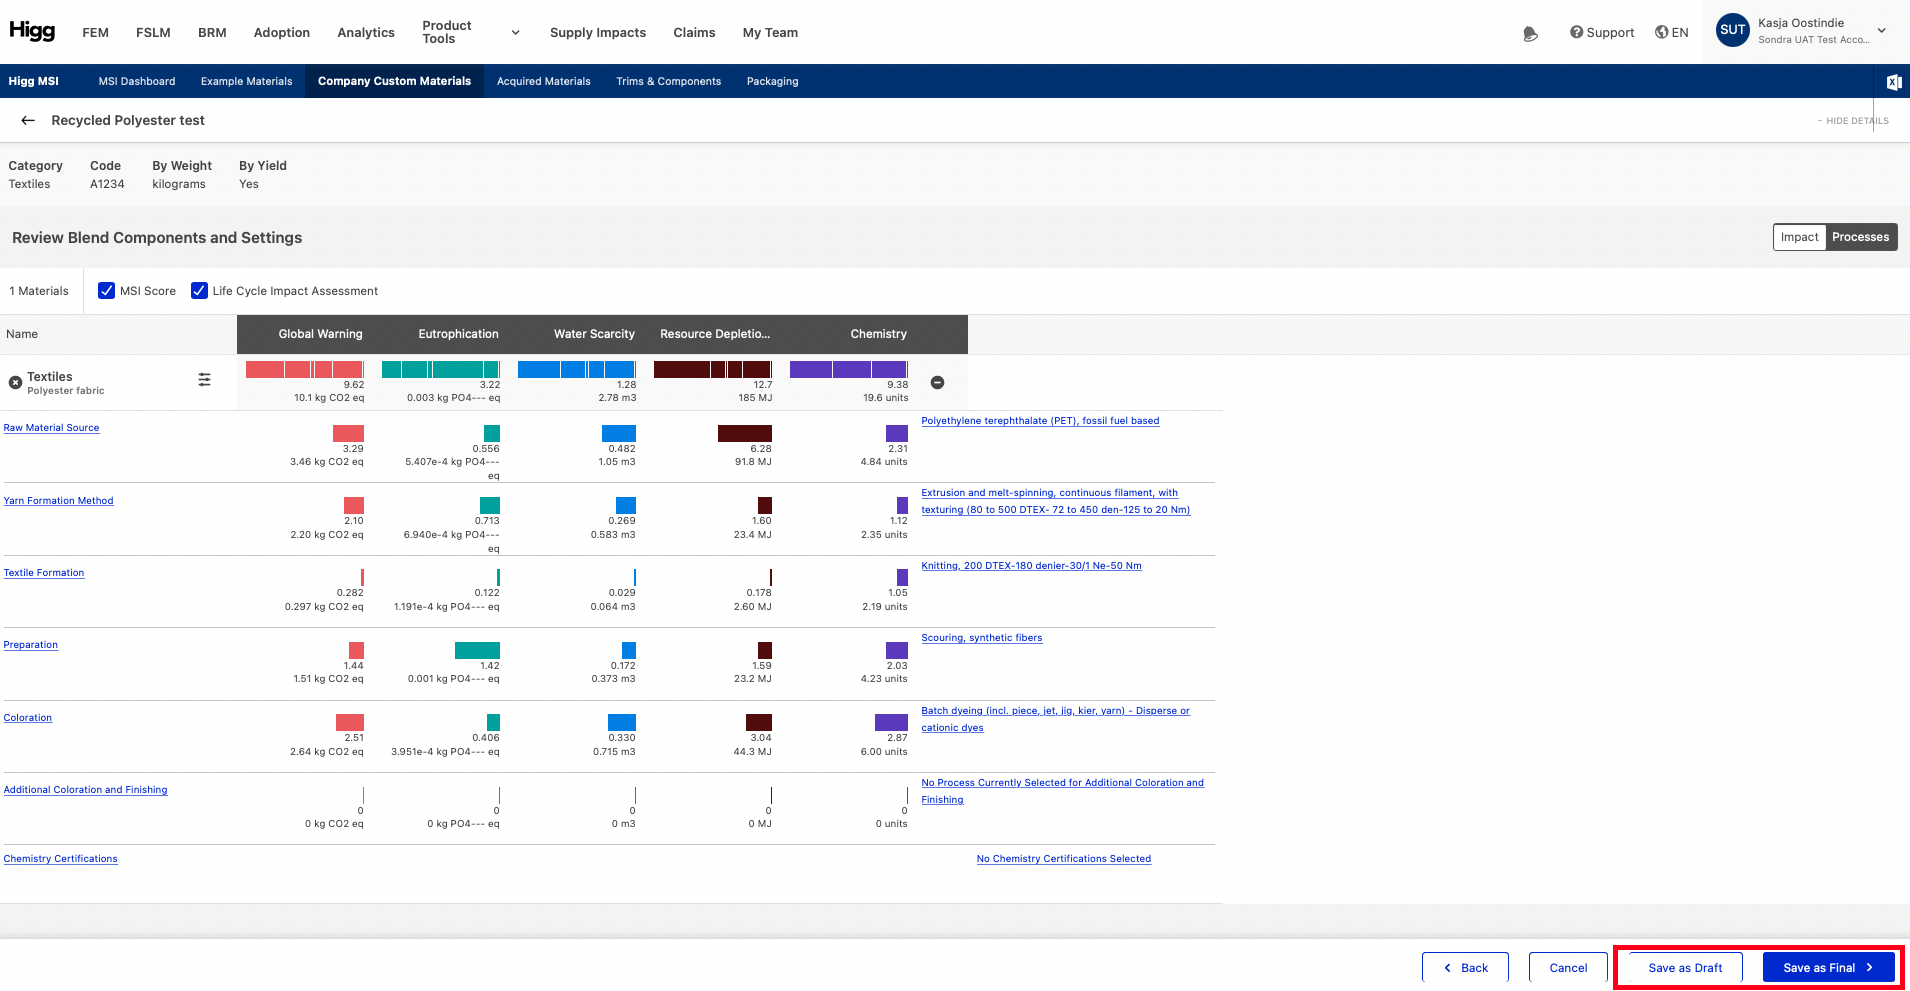
4.5 Saving Custom Materials
There are two options for saving Custom Materials to the Company Custom Materials Library:
- Save as Draft
- Save as Final
When customizing a material, there are two buttons at the bottom of the screen, indicating whether it is being saved as a draft material or a final material. Both materials will be saved to the Company Custom Materials Library, but only materials saved as final are available for use in the Higg Product Module.
4.6 Creating a Material Blend
Material Blends are a type of Custom Material containing more than one type of base material. Blends can be created using a combination of Example Materials, Custom Materials, and Acquired Materials.
The initial steps to create a blend are the same as to customize an Example Material:
- Click the “Create a Custom Material” button
- Enter a Material Name and Material Category (and any optional selections) on the material customization page.
- Select “Add Materials” on the bottom right corner of the page
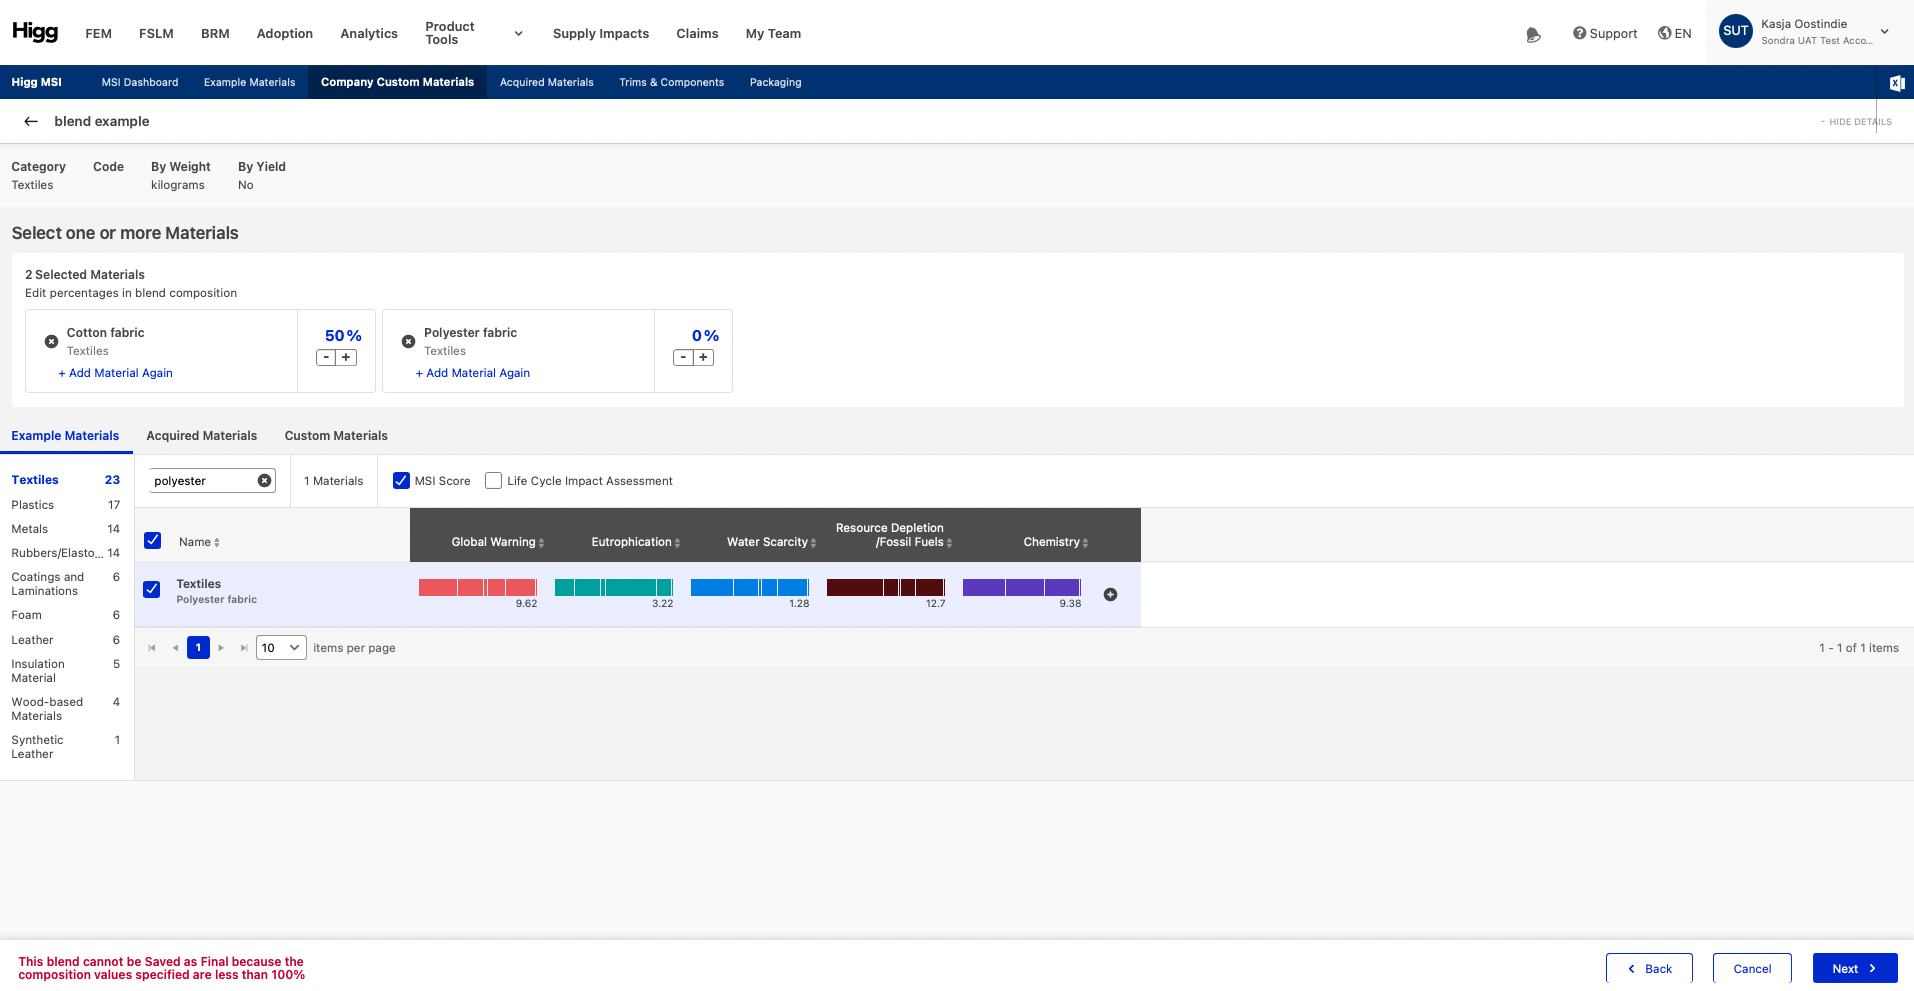
On the following page, search the lists to select the materials that will be combined into a Material Blend.
The “Add Material Again” option can be used to add the same material multiple times to the blend, if the processes applied to different percentages of the same material will be different (for instance, if a material is a blend of virgin and recycled categories of the same material).
Once the material components have been selected, the composition of the blend, the percentages, need to be specified. If the composition values specified are less than 100% it is not possible to move to the next step. Click next to further customize the processes and raw material sources of the blend.
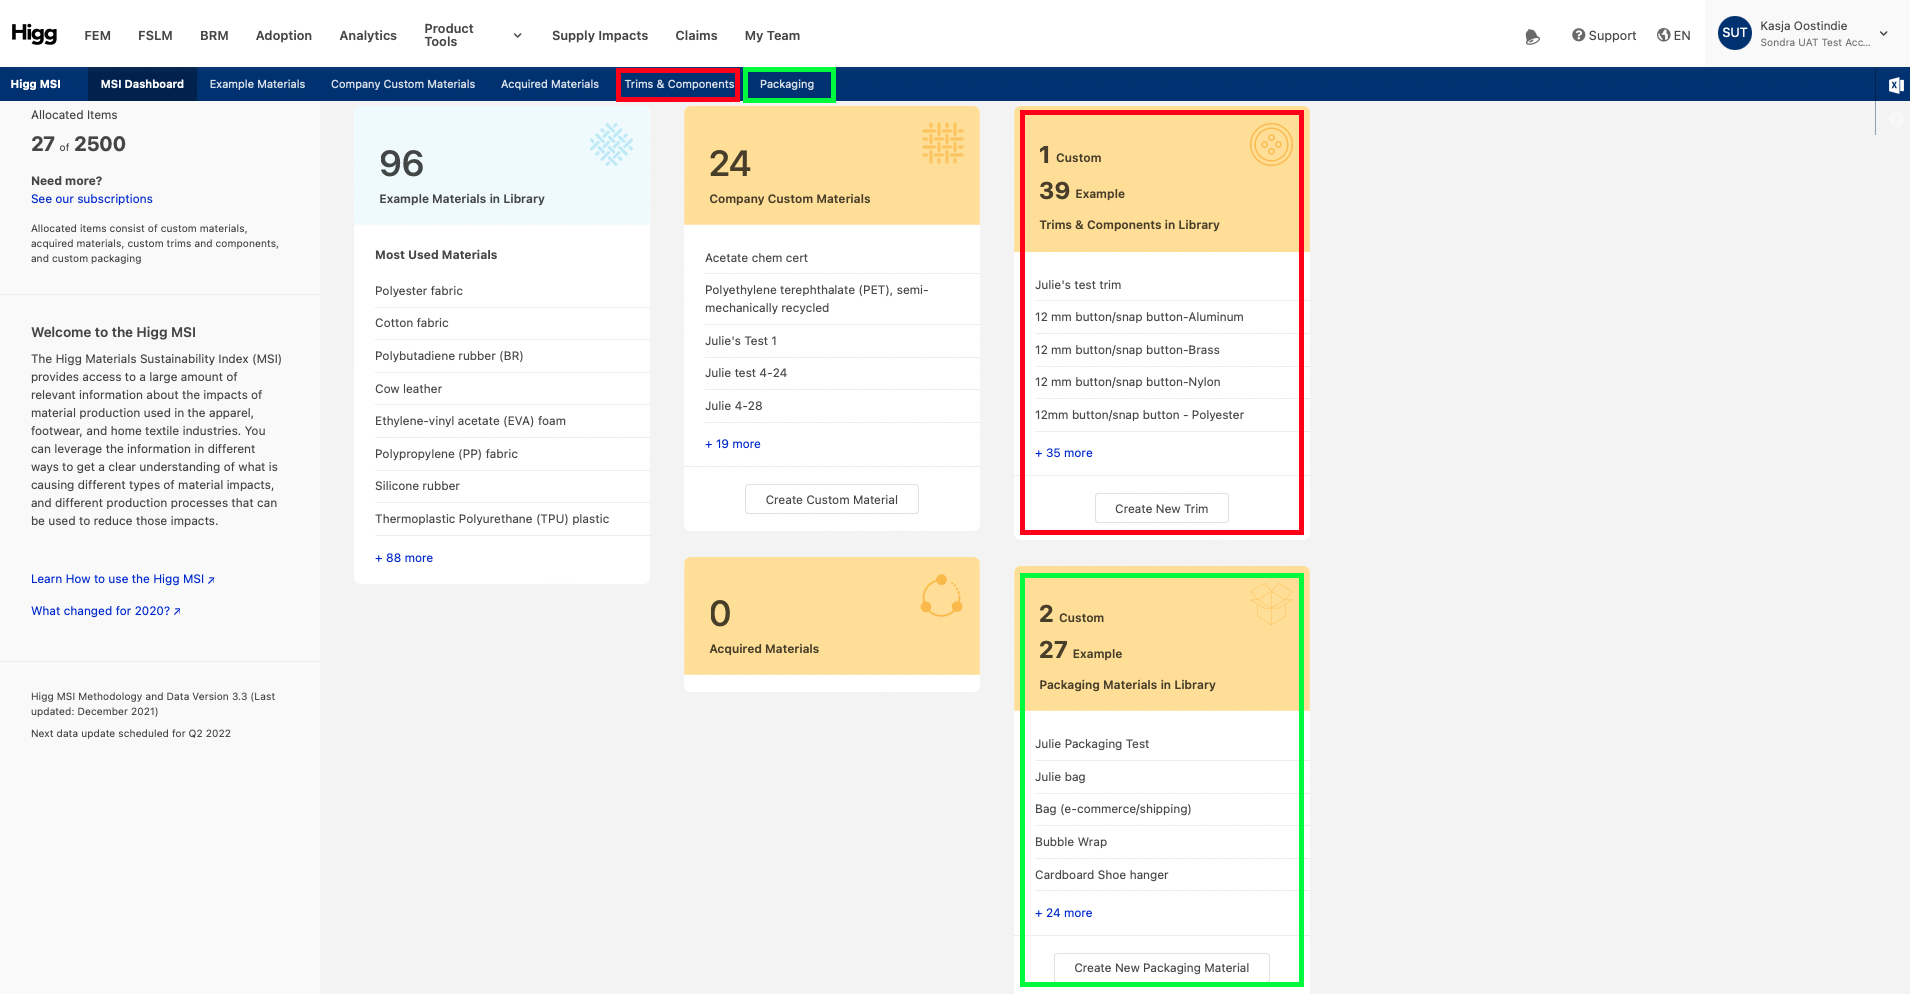
The Higg MSI also includes a Trims & Components Library as well as a Packaging Library. Note:Because both of these libraries function in the same way and have the same features, this section will use the term “Trims Library” and “Trim” to refer to the functionalities of both the Trims & Components Library as well as the Packaging Library. Packaging can be customized, saved, and accessed in the same way as Trims.
Both of these libraries can be accessed from the Higg MSI dashboard or from any other page via the navigation bar. In the screenshot below the green rectangles indicate ways to navigate to the packaging library, the red rectangles the trims library.
Opening the Trims Library will open a library similar to the Example Materials Library, except that the sidebar will show All Trims, Example Trims, My Trims, and Drafts Only. Example Trims are the default options available in the Higg MSI, while My Trims are customized Trims (similar to Custom Materials).
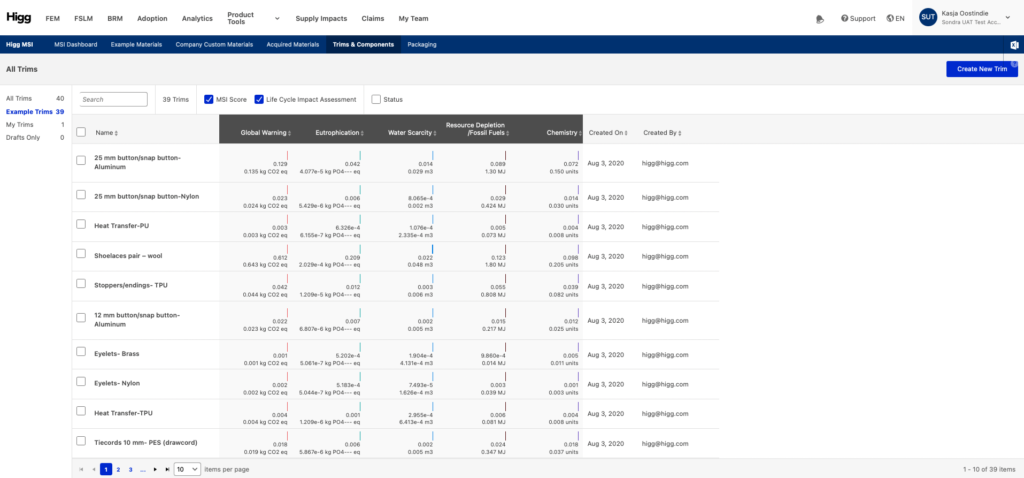
As with the Example Materials, it is possible to switch between different score views, including MSI Scores and LCIA. Clicking on the “Create New Trim” button will open a new screen to begin to create a customized Trim.
5.1 Creating Custom Trims and Packaging
To create a new Trim, a unique Trim Name must be selected. Additional information, including vendor name, part number, and a description can also be added. All fields except “Trim Name” are optional.
This screen also allows you to update the Defect Rate if you have the specific information required, as described in the Content Guidance.
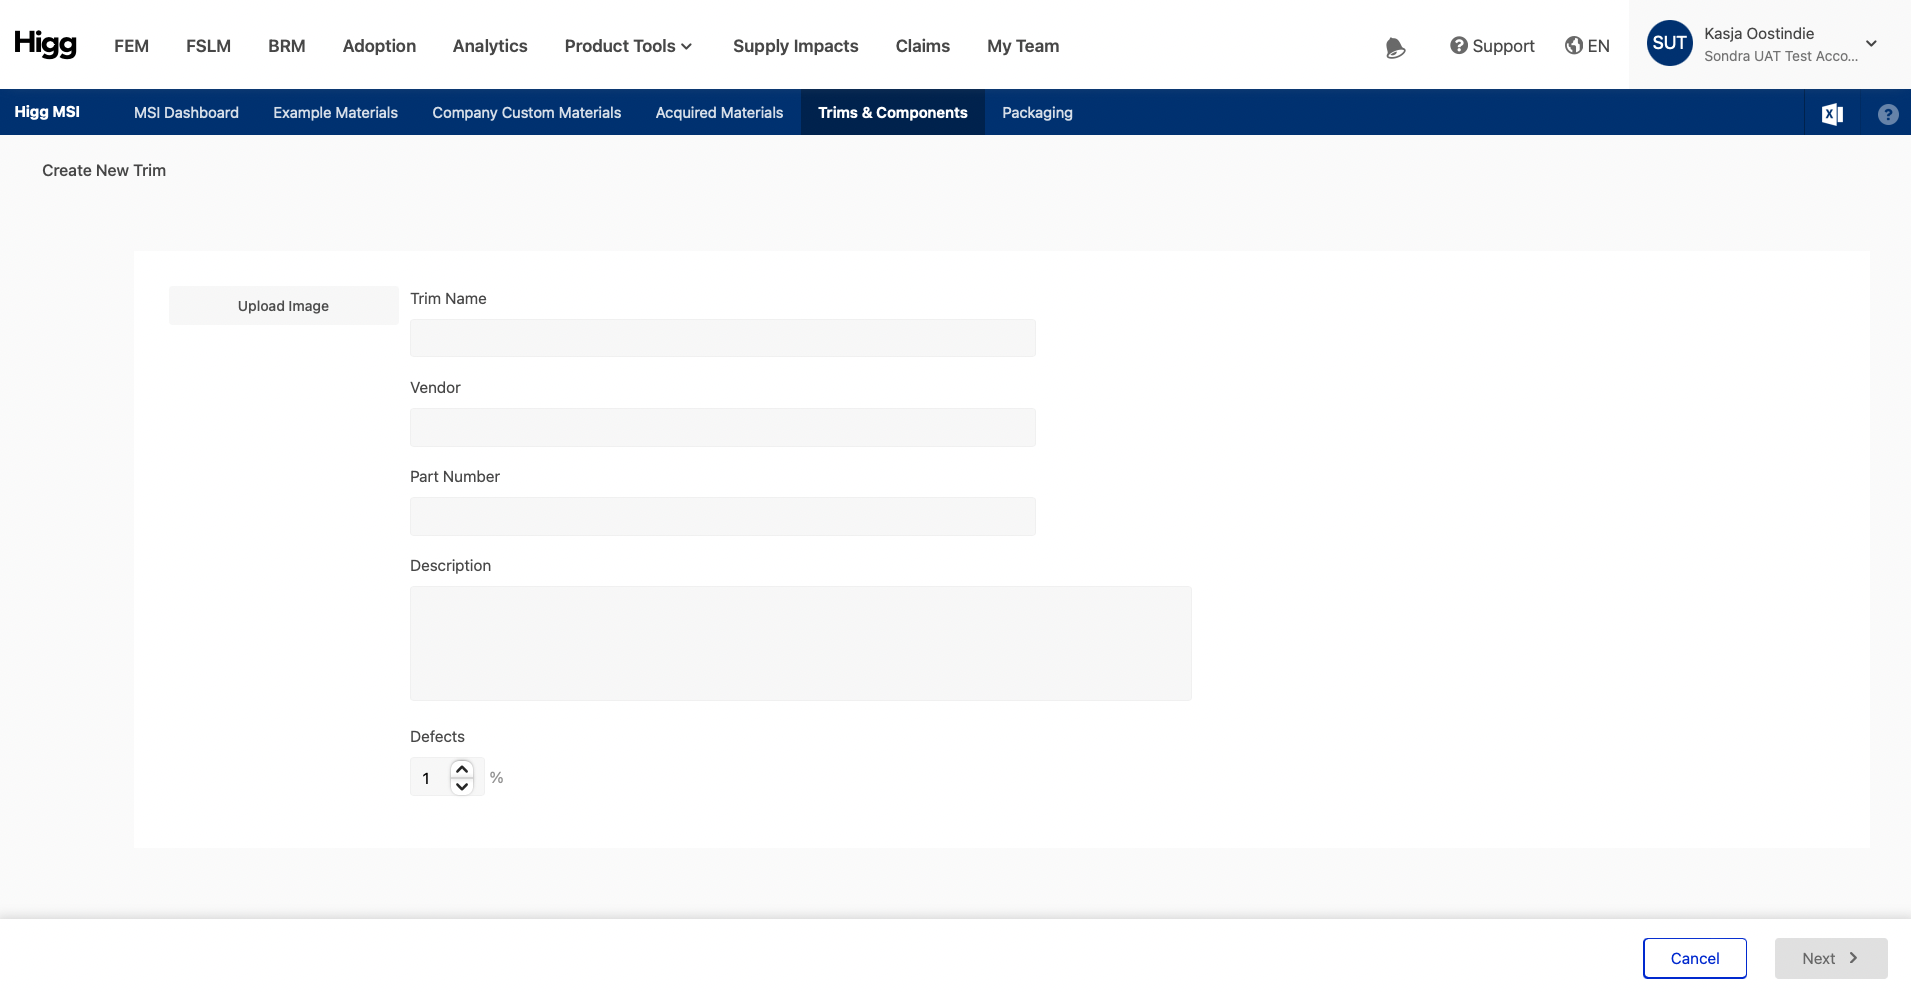
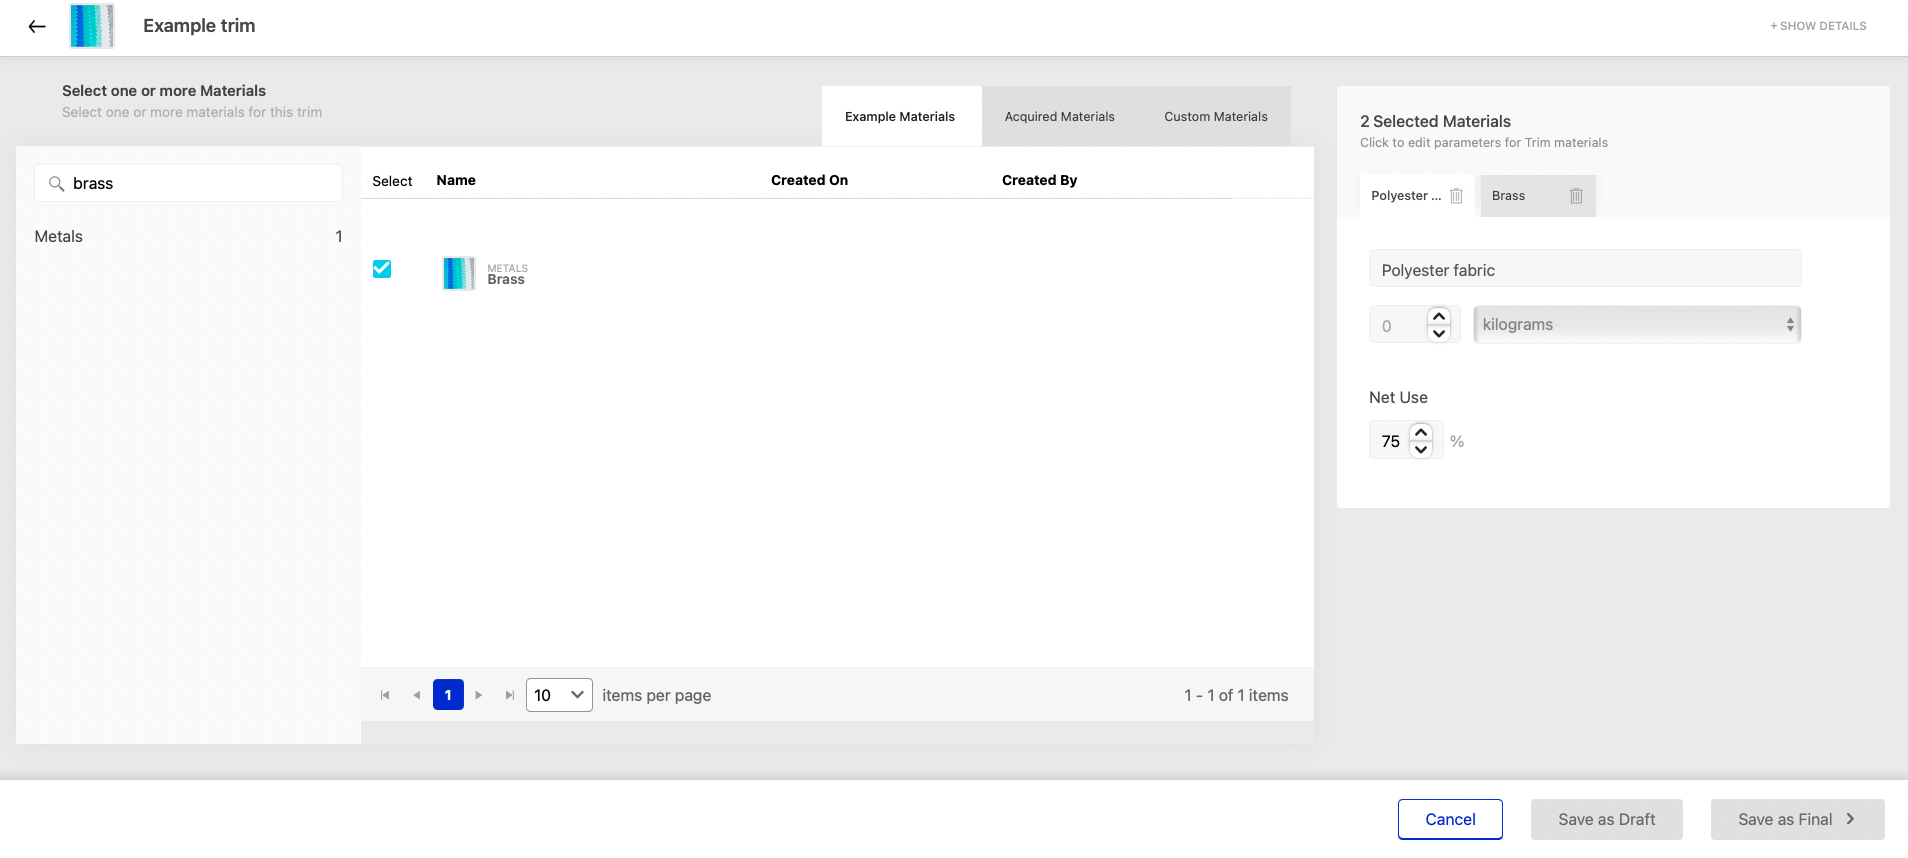
After clicking “Next”, one or more materials can be added to the custom Trim. These can be Example Materials, Acquired Materials, or Custom Materials.
The search bar functions in the same way as for the Material Libraries to help find the specific component(s) needed. If two or more materials are selected, they will show in different tabs. For each material, the weight and net use needs to be specified. To work with yield, create a custom material with yield (see section 3.1) and use this material to create the trim.
5.2 Net use in trims
The trim’s weight is the net weight. Please enter the actual net weight here. The system will then calculate the gross use of material based on the net use percentage and the net weight entered by the user. To illustrate:
Polyester laces have a net weight of 20 grams and in the production process about 10% is wasted. When creating the trim, a net use of 90% and a weight of 20 grams are inserted. The MSI uses this information to calculate what the gross weight of the material was to produce this trim (22.22 grams). The MSI uses this number in the calculation of total material impact.
After adding the desired material(s), specifying the weight and net use for each material input, the trim can be saved as draft or final.
Custom trims can be found under “My Trims” in the Trims & Components Library. Please note that draft trims will not be available in the Higg Product Module trims library.
5.3 Creating footwear subassemblies as trims
Trims can be used to model subassemblies for footwear. The Bill of Materials of a footwear product often include subassemblies such as a toe-box, counterforts and an in- or outsole to name a few examples. When modeling footwear in the Higg Product Module, it can be helpful to have modeled the sub-assemblies in the MSI as opposed to adding the materials of the subassemblies to the Bill of Materials in the Higg Product Module. Another advantage of modeling subassemblies as trims is that the subassemblies only have to be modeled once and can be used in all products without having to specify the net use and weight in the Bill of Materials in the Higg Product Module.
Please see section 4.1 on how to create a trim.
6. Sharing and Receiving Materials
The Higg MSI allows users to share Custom Materials with each other. Shared materials are referred to as “Acquired Materials” in the Higg MSI and appear in the Acquired Materials Library.
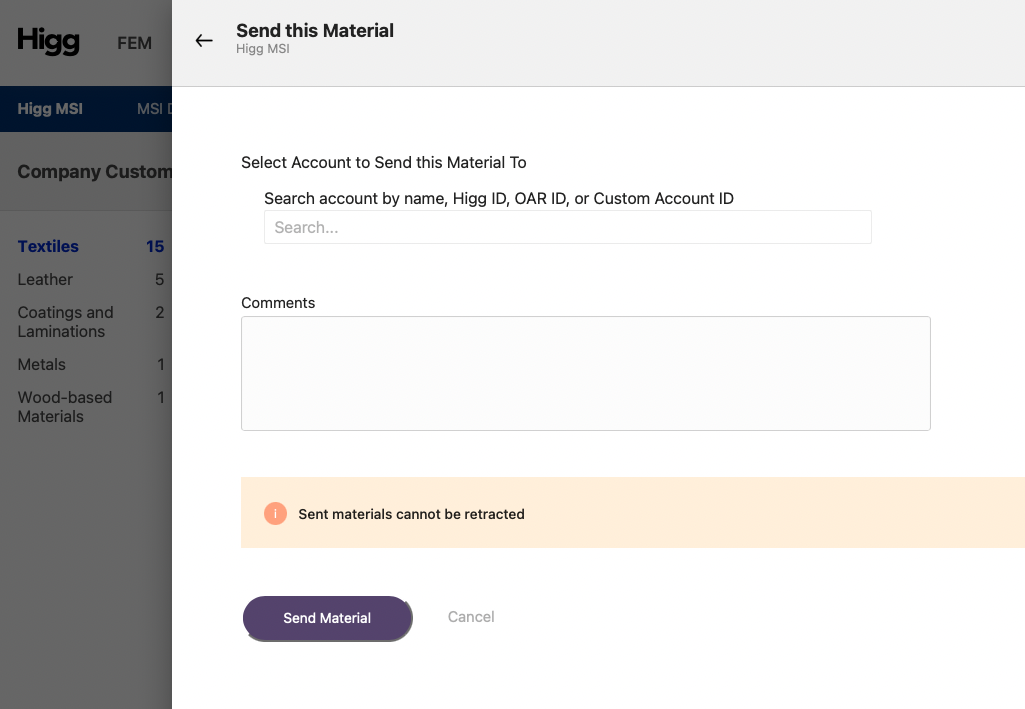
Selecting a Custom Material from the Company Custom Material Library will activate the option to share the Custom Material with another user, using the “Send” button at the bottom left of the page.
After clicking “Send,” select the intended recipient from a list of eligible Higg.org user accounts, add an optional comment if desired, and click “Send Material”. Note: once a material has been sent, it is not possible to retract the share.
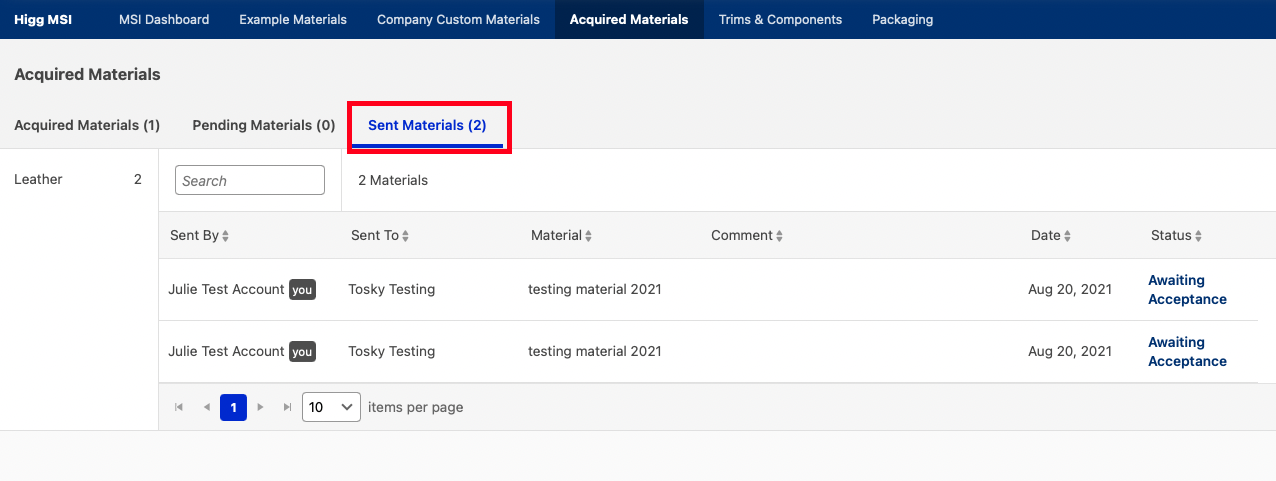
All materials that have been shared and received, and their statuses, will be visible in the Acquired Materials section of the Higg MSI. There is no limit on the number of materials that a user can send. An overview of all the materials shared by the user are visible in the ‘Sent Materials’-tab.
If a material is updated after sending, it will be possible to resend the same material to previous recipients. The recipients will have the option to accept the new sent material and override the previous version accepted.
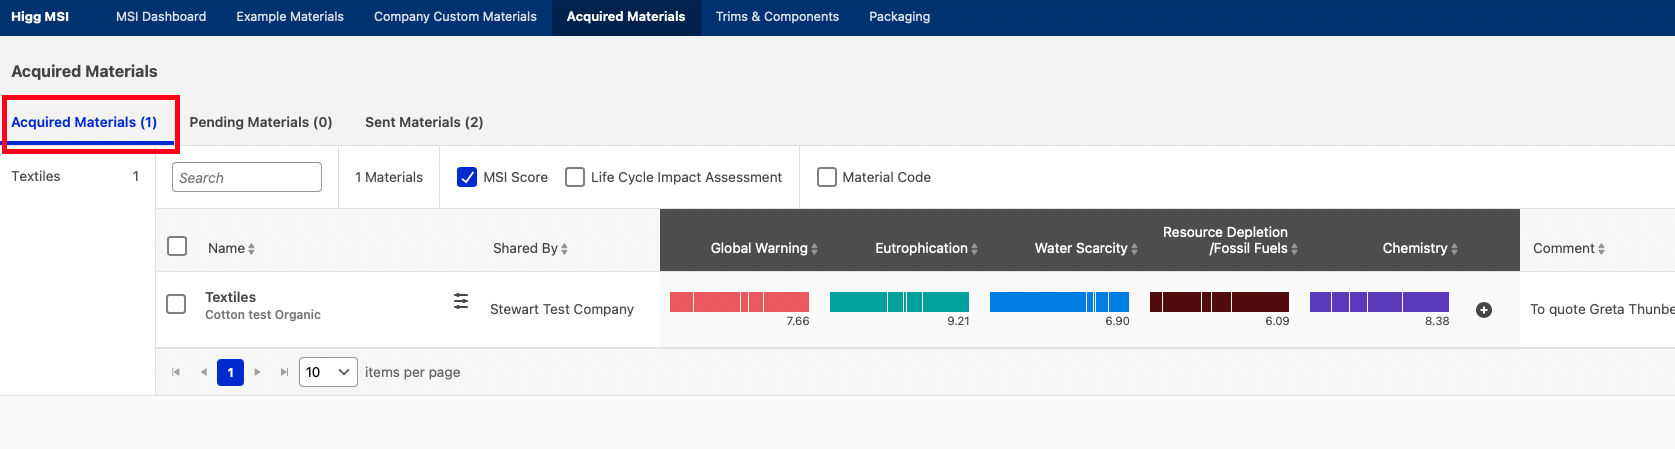
When a user has received a material share, it will be visible in the Pending Materials tab. The material share can be accepted or rejected.
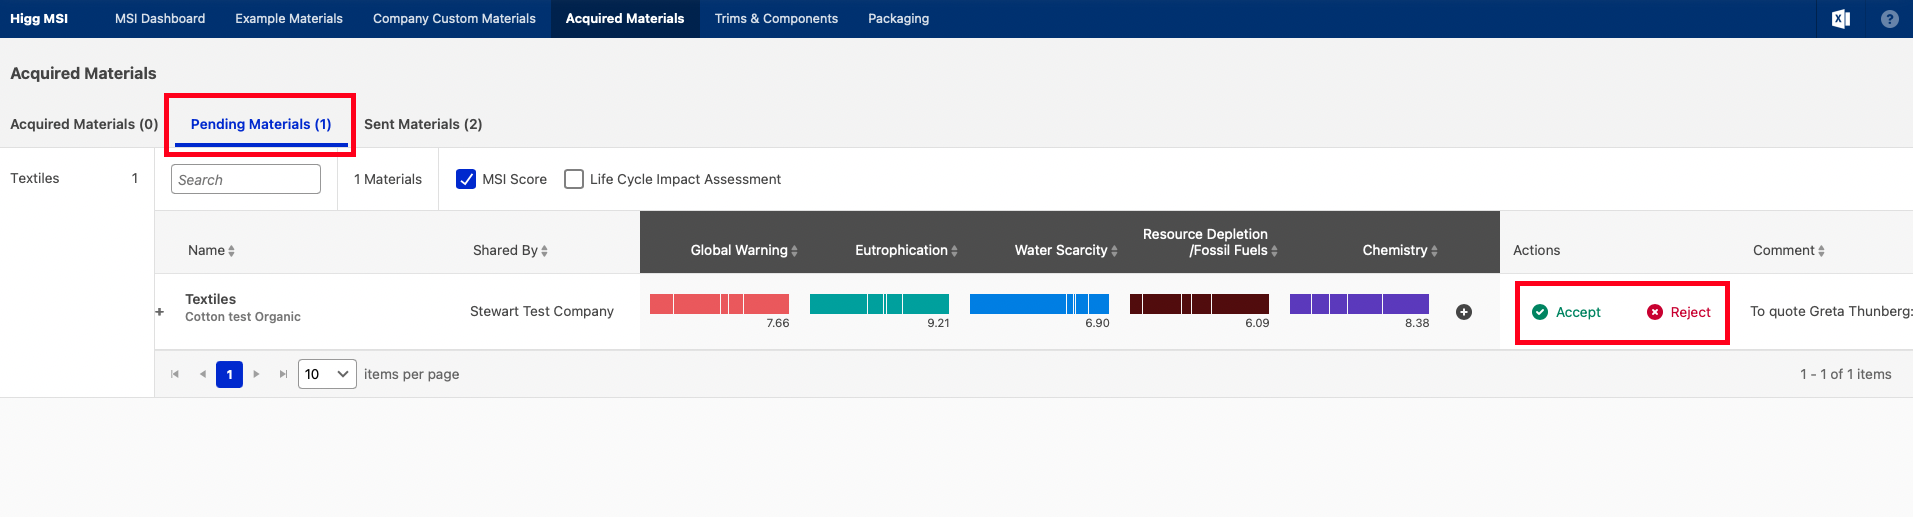
If the material is accepted, it will move to the Acquired Materials Library. Note: Acquired materials count toward an account’s allocation limit.
7. Exporting Custom Materials
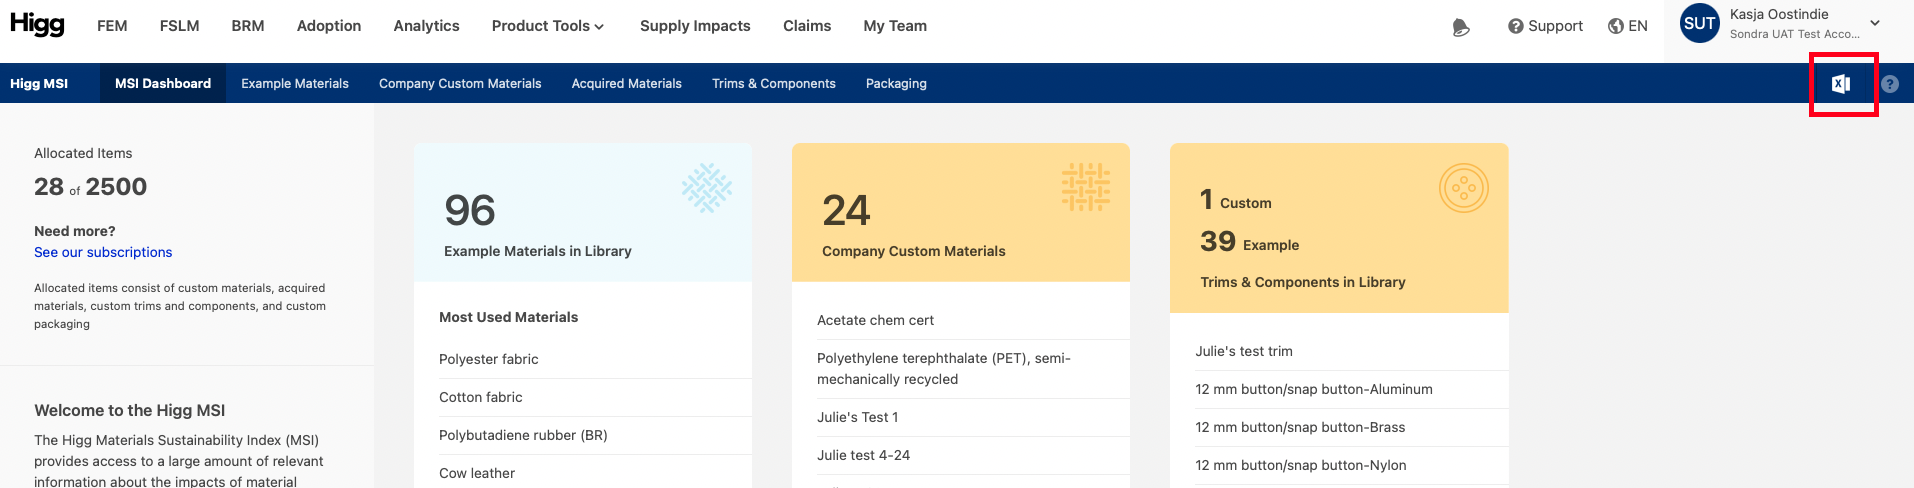
It is possible to export all data from all Company Custom Materials, Trims & Components and Packaging Materials from the Higg MSI using Microsoft Excel.
The export can be initiated by clicking on the Excel logo on the top right-hand side of the Higg MSI navigation bar.
The export will contain the following information for each Custom Material:
- Material Name
- Material ID
- Material Code
- Material components and percentages
- Material score (aggregated)
- Component scores and LCIA midpoints (Global Warming, Eutrophication, Water Scarcity, Abiotic Resource Depletion, Chemistry)
- Biogenic carbon content and water consumption rating
- Process descriptions and certifications
- Loss Rates, Transportation Modes, Inbound Transport Distances, and Chemistry Certifications