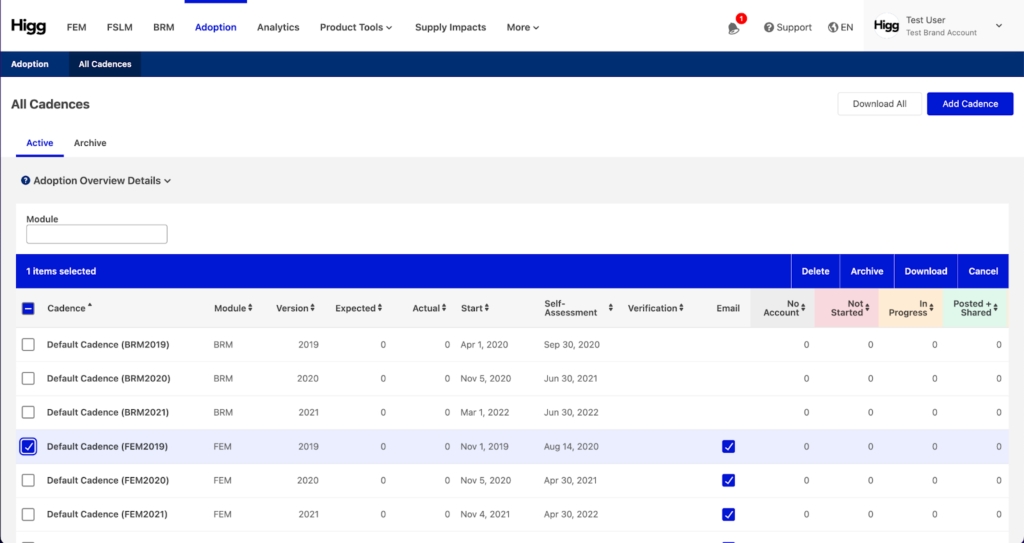
Adoption Tool Dashboard
The first time you open the Adoption Tool, your dashboard will display a default cadence for Higg FEM, Higg FSLM*, and Higg BRM.
*Higg FSLM assessment cadences are rolling reporting cycles, so the dates can be set by your company. FEM and BRM assessments work on a set reporting timeline.
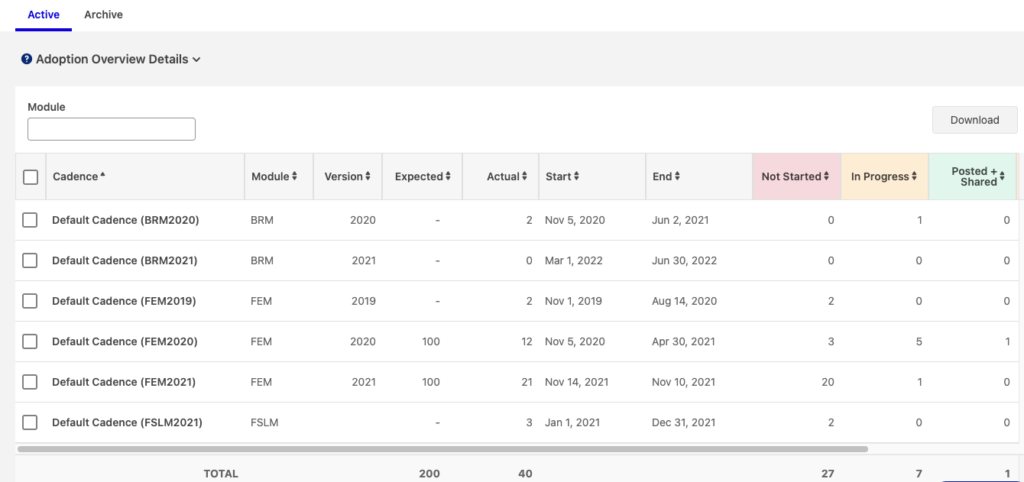
This is your dashboard view. From here, you get a high level view of the cadences that are available to track, as well as:
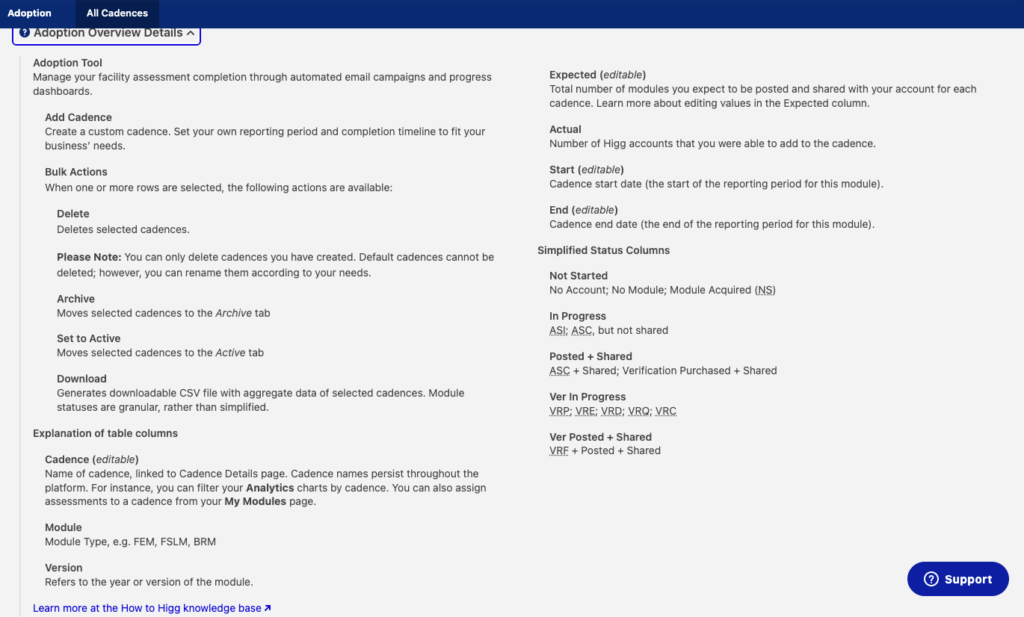
- Familiarize yourself with terms, statuses, and the general flow of the Adoption Tool (Select the Adoption Overview Details dropdown (top left corner)
- Know which of your suppliers do not have a Worldly account at a glance, based on the Not Started, In Progress, and Assessment Shared columns
To view a description of table fields, select the Adoption Overview Details dropdown (top left corner).
Custom Cadences
The custom cadence feature provides the flexibility needed to set up cadences that are different from the tool’s Default cadences and that reflect the account’s specific module tracking needs.
Here are some examples of cadence criteria:
- Module Type – manage separate cadences for Higg FEM completion, FEM Foundations completion, Higg FSLM completion, and Higg BRM completion.
- Verification – in the case that you require only a subset of your value chain partners to get their assessments verified and complete vFEM or vFSLM, you may want to create a new cadence for these accounts that is separate from the accounts that are only required to complete the self-assessment, without verification.
- Time – a set window of time in which a facility has to complete a specified module. You may have a need for multiple module onboarding dates and deadlines throughout the year. For example, create multiple Higg FSLM cadences with different end dates that reflect specific audit periods. Or set an early deadline for those value chain partners who’ve consistently completed FEM in previous years. You can also set separate dates for self-assessment and verification deadlines.
- Account Type – set up custom cadences based on different product categories or tiers. This would allow you to monitor module progress by group (i.e. Fabric mills, tier 1 suppliers, etc.)
- Location – customize cadences based on facility location (i.e. region or country).
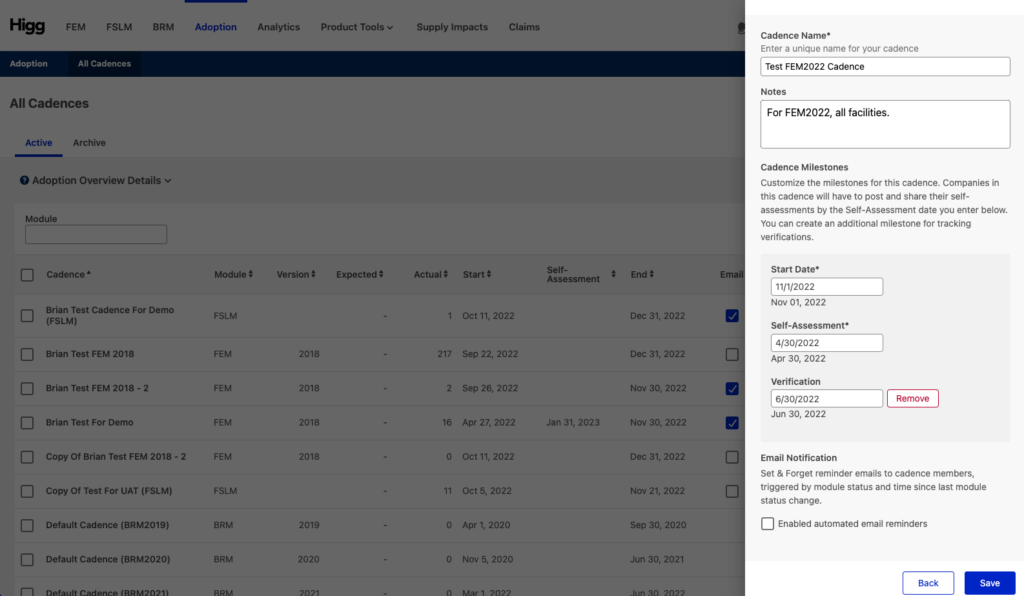
How to create a custom cadence
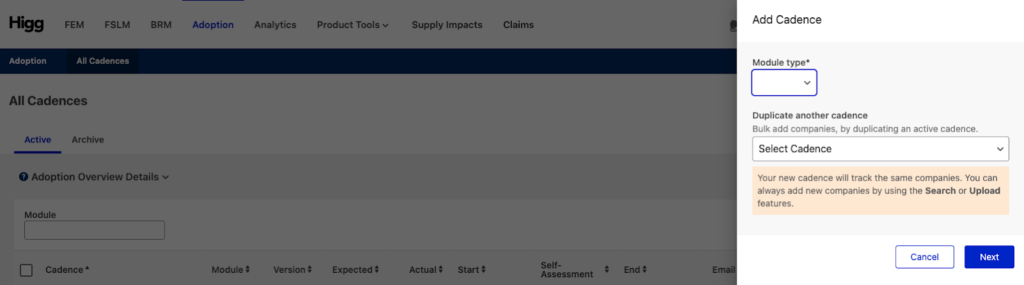
1. From the main adoption tool dashboard, click the Add Cadence button to begin designing your cadence.
- Enter cadence information
- Select the module type (and year if selecting FEM or BRM)
- Decide if you wish to duplicate an existing cadence or create a new one.
- Duplicating a cadence will automatically upload the same accounts list from the cadence you select.
- If you want to create a full new cadence, leave “Select Cadence” selected and click next.
- Then create a cadence name, add any notes or a cadence description, and set start and completion dates. You can set individual completion dates for the self-assessment and verification if needed.
- Enable automated email communications* if you wish. Please note if you turn the communications off the facility will still receive one communication from the platform notifying them you are tracking their module. *If you want facilities that do not have an account yet to receive an automated email inviting them to create a Worldly account, you have to select this option. You can always enable the email communication at a later point in time by editing the cadence settings, however, records with no account will not receive an automated email. If you want the automated email to be sent out to records with no account, the list needs to be re-uploaded to the cadence. For default cadences, the automated email communication is by default enabled.
- Save the cadence.
Now you are ready to add accounts to the cadence.
Add Accounts to a Cadence
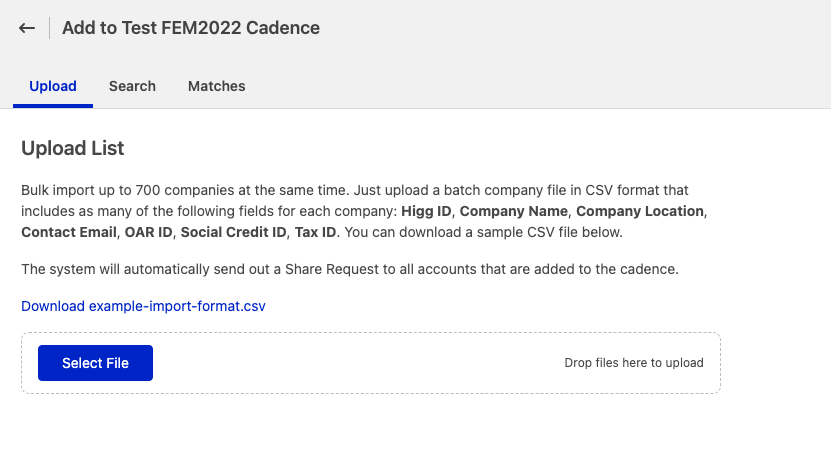
After creating a new cadence, you will be asked to upload accounts.
Options:
- Upload Account List
- Search for Individual Accounts
Upload Account List
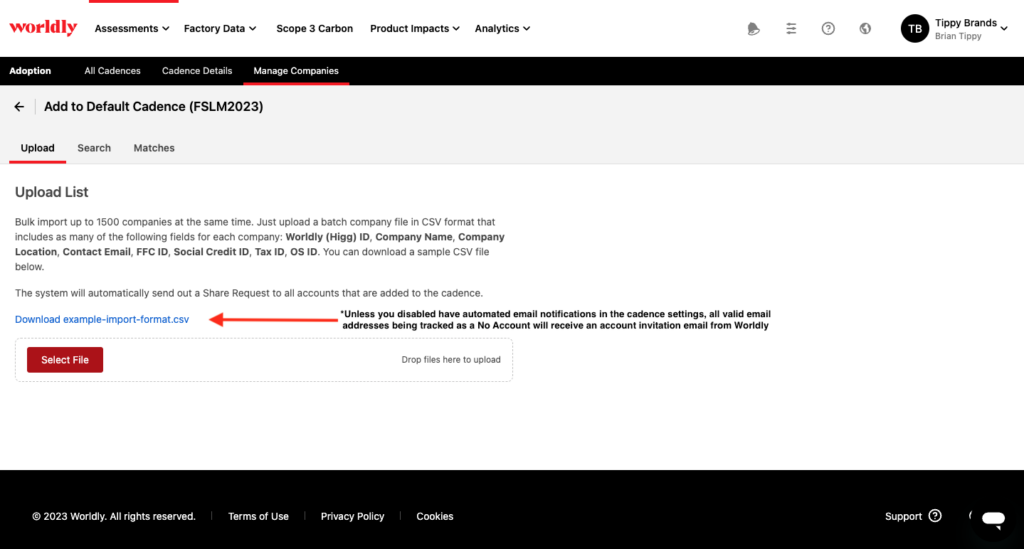
This feature can be used to add accounts to your cadence and send invitations in bulk. Download the CSV Upload Format to view the specified import file format. Refer to the following section for list preparation guidance.
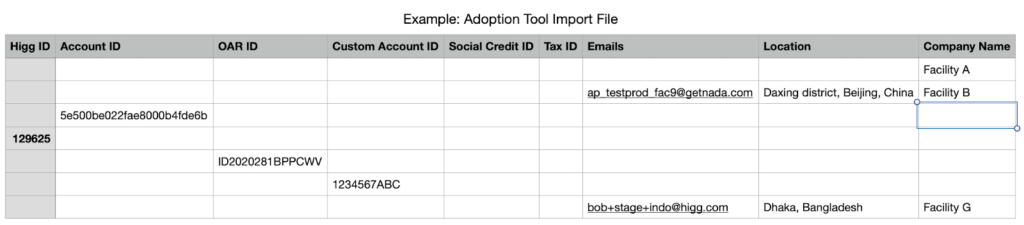
Prepare Your List
| Worldly ID | Account ID | OS ID | Custom Account ID | Social Credit ID | Tax ID | Emails* | Location | Company Name |
Each field corresponds to a specific account criteria that is used in the search process to determine account matches when the list is loaded.
List Fields and Criteria
IDs
- Worldly ID* (previously Higg ID) = the shorter numeric string used as a unique identifier (i.e. 138382)
- Account ID* = the longer alphanumeric string used as a unique identifier (i.e. 3b7027750db4d52e5079a…)
*Worldly ID or Account ID are the best criteria to use to find a direct Worldly account match. For each record where the Worldly/Account ID is known, all other data (email, address, name) are not necessary to include in this import file. These two IDs can be found in previous Higg FEM pages (tip: download the bulk CSV from your FEM modules page to find the Worldly IDs for accounts that have shared their module with you in the past.)
- OS ID = a 15-character unique Open Supply Hub ID associated with facility accounts (i.e. CN2019067NZ95AM)
- Tax ID = the unique company tax ID
- Social Credit ID = a unique, 18-digit national business registration number issued to all businesses and other entities in China
- Multiple email addresses are accepted, but must be separated by a semicolon.
- The system will look for matching Worldly account user email addresses.
*If you want records that have no Worldly account yet to receive an automated email inviting them to create an account on the Worldly platform, then you have to include the email address.
Street Address
For each record where the full address is unknown, try to be as specific as possible. If the street name is unknown, try to at least provide data for City and Country.
- The system will look for Worldly accounts that have an address within a 100-meter radius of the input location.
Company Name
The system will search for the exact string provided. For example, if “Company, Inc.” is input, it will look for that exact string and yield results that contain “Company, Inc.” If an exact match is not found, it will present potential matches that will require further review.
See sample CSV bulk upload file pictured below. Each row represents a different account. Emails, Location, and Company Name data are only provided for those accounts where ID is unknown.
Once your CSV file has been populated with data and ready for import, you can use either the Upload button or the Darg & Drop File feature to upload your file. Note that the system will not accept CSV files that contain more than 700 records (rows of data). Please note that you do not need to have information in every column to upload, but the more information you upload the better results of matching.
View Upload Results
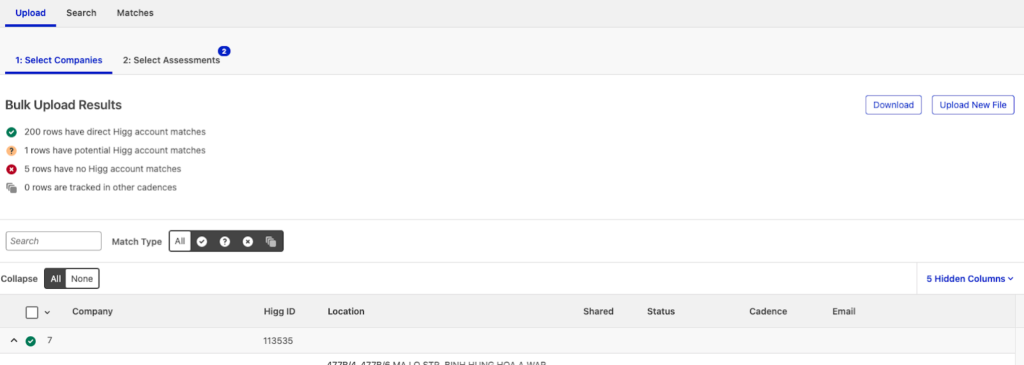
Step 1: Once you submit your list, the system begins a data validation process and begins matching records from your list to existing Worldly accounts. The processing time is dependent on the size of the list, larger lists could take a few minutes to load. Once the evaluation process is complete, you will see a paginated list of results displayed in a grid layout.
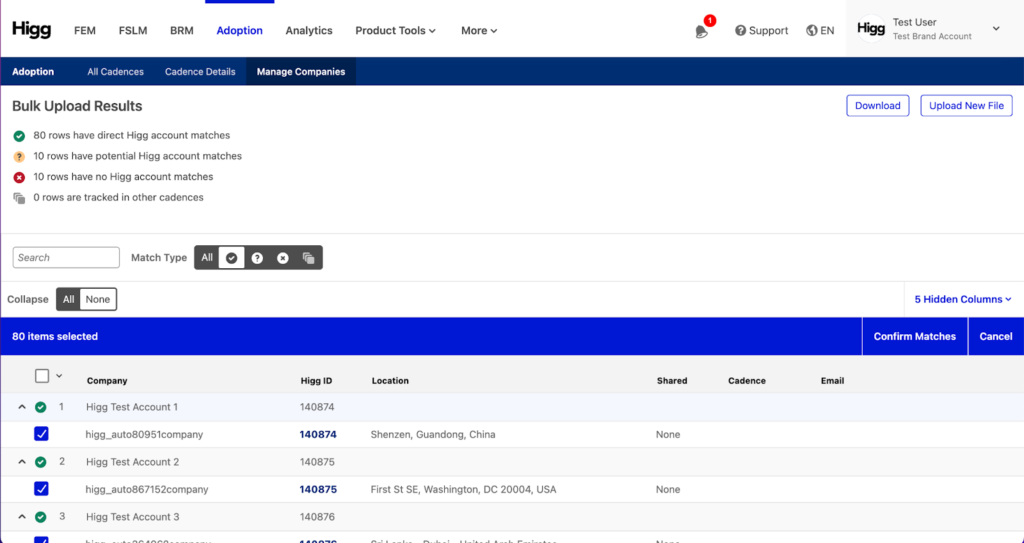
Step 2: Review these results and select which accounts to add to the cadence. This phase allows you to preview and confirm the accuracy of account matches before adding them to the cadence, thus preventing incorrect accounts being added and sending a notification. It is helpful to have your import file open as you review these results. If you scroll to the bottom of this page, you will find a dropdown which allows you to change the number of items displayed per page (10-700).
If you scroll to the bottom of this page, you will find a dropdown which allows you to change the number of items displayed per page (10-700).
Results Guide
You can filter at the top of the results by looking at direct matches, potential matches, or no account.
The results grid will show you the following information.
| Field | Description |
| Row | The row number of the original record from the import file. |
| Company | This will show the company name in the import file and the matched account’s platform name. |
| Worldly ID | The Worldly ID (previously Higg ID) for the matched record. |
| Location | The full address on the account from the matched record. |
| Previous Share | Used to provide information about if the matched record has ever shared any other modules with the cadence owner. |
| Shared | Used to provide information about if the matched record has shared the target module for this cadence with the cadence owner. |
| Status | The status of the target module for this cadence. Options include every platform status, plus an additional status for “Not Acquired”:
|
| Cadence | If this account is in another cadence, the cadence title will be shown here. If the account already exists in this cadence, that will also be shown here. |
| The email address of the user on the account from the matched record. | |
| OS ID* | The OS ID for the matched record (if the account has one). |
| Custom Account ID* | The custom ID for the matched record (if the account has one). |
| Social Credit ID* | The social credit ID for the matched record (if the account has one). |
| Account ID* | The Worldly Account ID for the matched record. |
Tip #1: Customize the table layout. You may choose which fields you’d like to see on your results table. The fields marked above with an asterisk will not automatically show in initial import results unless selected manually.
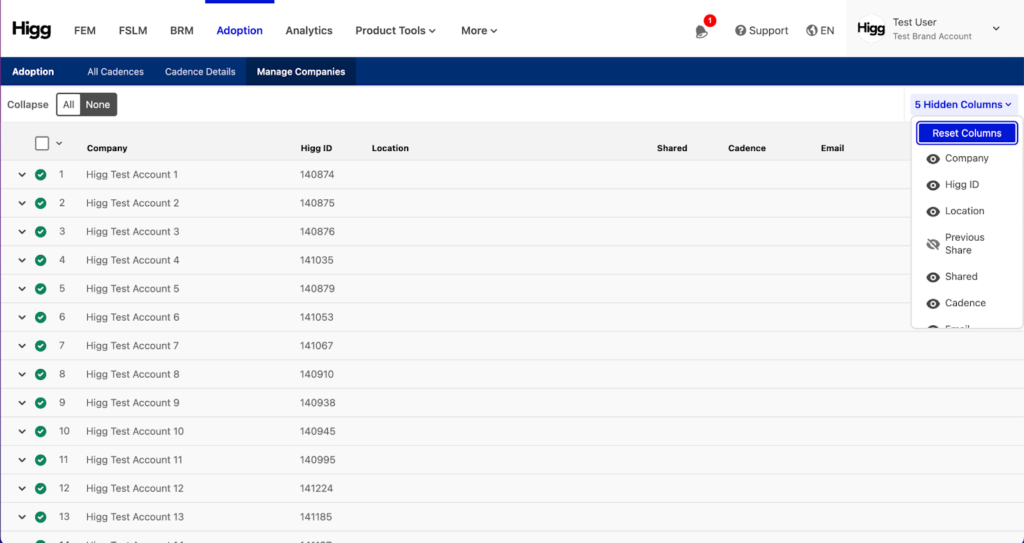
Review Direct Matches
Records that have Direct Matches will show as marked with a green check mark. Review direct matches and select to add to the cadence. Only direct Worldly ID matches will result in a direct match.
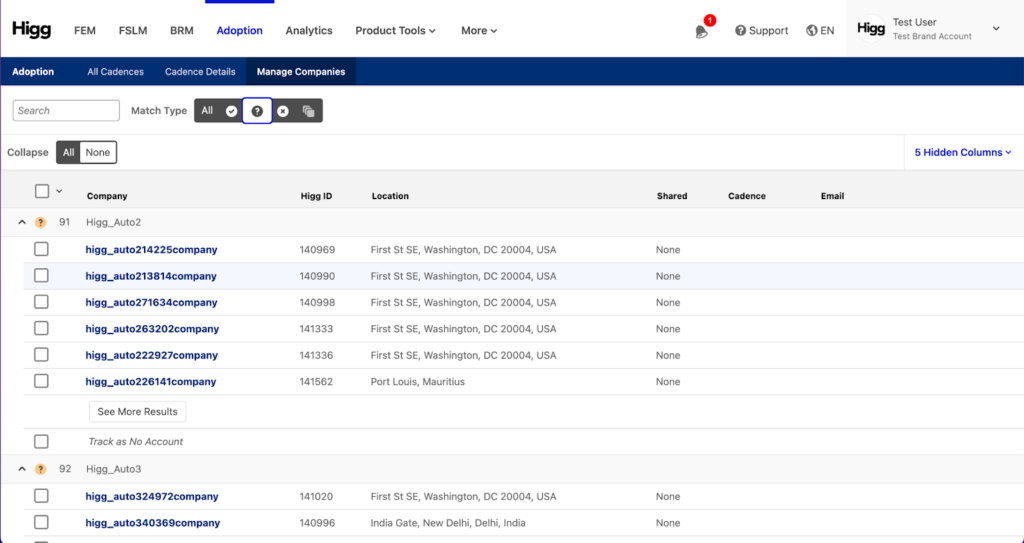
Review Potential Matches
Records that have Potential Matches will show as marked with a yellow question mark, and you can view potential matches by clicking See More Results (if needed). Potential matches will default to the first six matches, but can be expanded to 20 matches. If you still don’t see a match after that, you can mark it as “No Account” or go to the Search Tab and change your search. View potential matches (click See More Results if needed), and select the correct account or select ‘Track as No Account’ if none are correct. After selecting the correct account, click Add the Cadence.
Review Records with No Matches
Records that have No Matches will show as marked with a red x mark. These are accounts that no matched account could be found for based on the information in the CSV upload. You can search directly, or add these to cadence to track as ‘No Account’. Please review this guidance on records with ‘No Account’.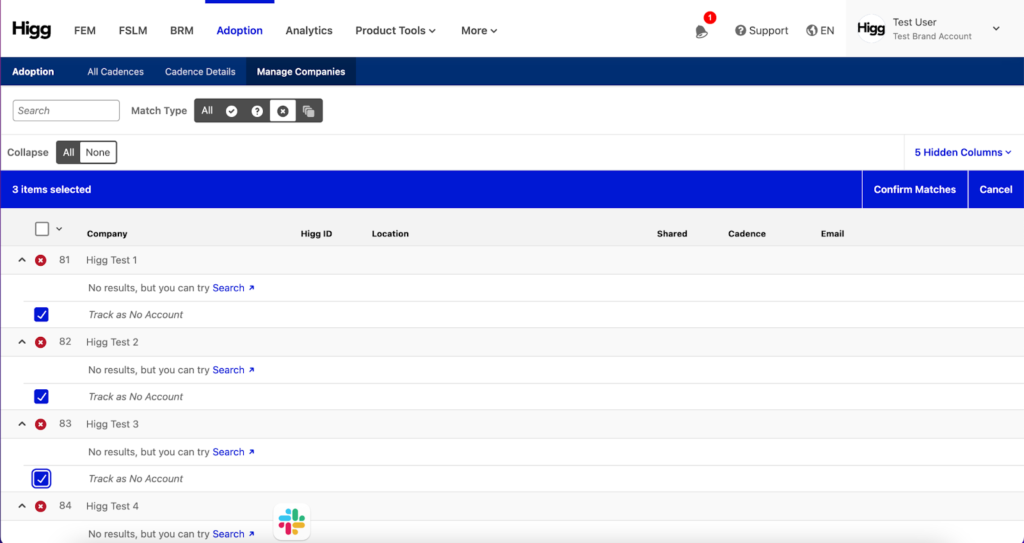
Once you have fully reviewed upload results and selected accounts, you can add to cadence.

You can return to these import results any time, even after you exit this page. When you navigate to Upload, you will see a running list of uploads for this cadence. To view the results of a previous upload, simply click on the item from the list to view.
Tracking as ‘No Account’
For records (facilities) that you would like to track, but have not yet created a Worldly account, you now have the ability to track these records in your cadences. For potential matches and no matches, you can select ‘Track as No Account’. This will now appear as part of the ‘No Account’ status in your cadence and graphs.
*Records categorized as ‘No Account’ will receive an automated email inviting them to create an account on the Worldly platform, IF an email address has been entered in the file upload and IF the automated email communication option has been enabled when setting up the cadence. For default cadences, the automated email communication is by default enabled.
Unless the ‘automated email communication’ option has been disabled when setting up the cadence, all valid email addresses in the list upload that are tracked as ‘No Account’, will receive an automated email with an invite to create a Worldly account.
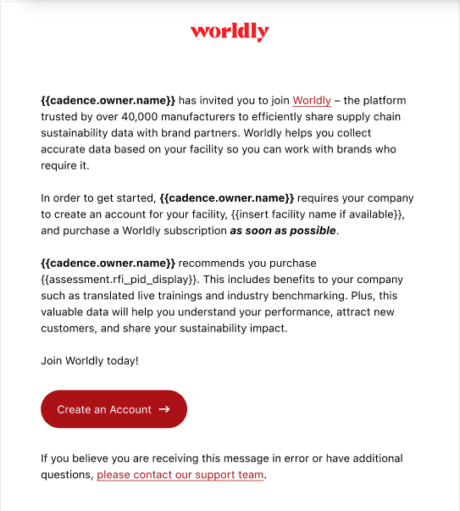
See below image for a preview of the invite email.
Manually Add Accounts To Cadence
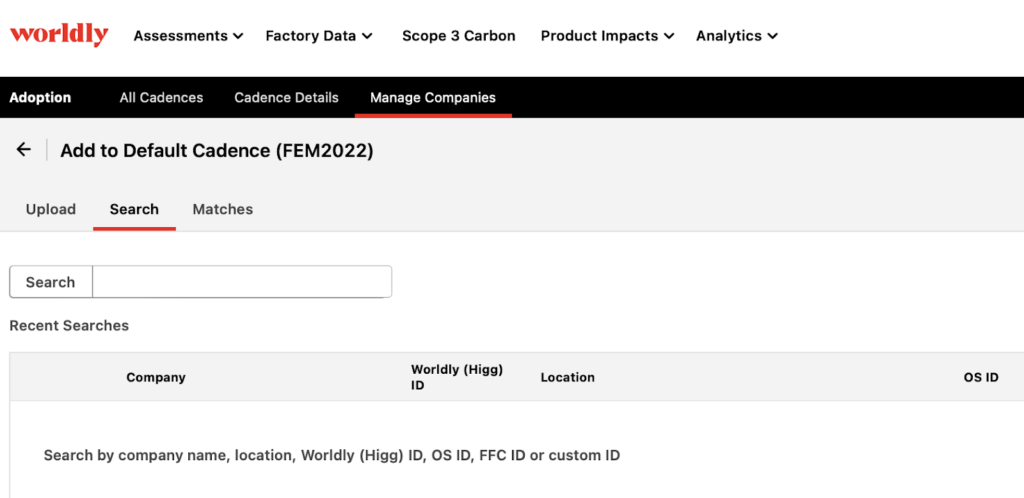
In a Cadence, navigate to ‘manage companies’ and then to the ‘search’ tab, to search for existing Worldly accounts to add to the cadence. You can use the account company name, Worldly ID, *OS ID, or Custom ID to look up individual accounts that you would like to add to your adoption cadence, so that you can start tracking their module progress. Click here for more information on OS IDs.
Step 1: In the Search box, enter a company name, Worldly ID (short or long version), OS ID, or Custom ID. This input will yield a list of match results for you to choose from.
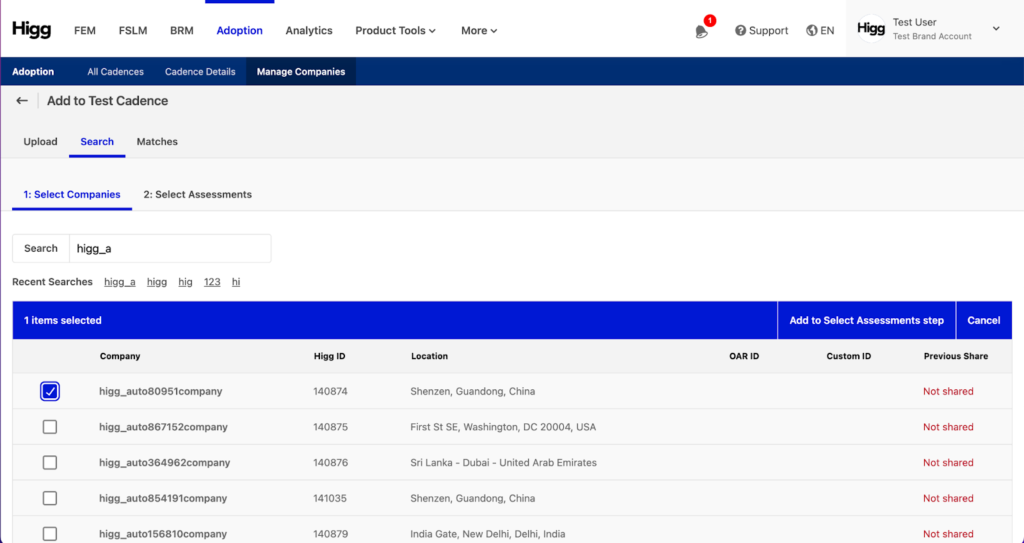
The system will remember your last five search terms.
Step 2: Review the list of results, to find the correct account to add to the cadence.
Column Header Guide:
| Column Header | Description |
| Company | The account name of the matched Worldly account. |
| Worldly ID | The Worldly ID (formerly Higg ID) for the matched record. |
| Location | The full address on the account from the matched record. |
| OS ID | The Open Supply Hub (OS Hub) ID is a unique identifier specific to facility-type accounts on worldly.io. Click here for more info on OS IDs. |
| Custom ID | Custom IDs are your company’s internal IDs that you have previously assigned to Worldly accounts. |
| Has Shared With Me | Indicates whether or not the matched record has shared the target module for this cadence with the cadence owner. |
| Status | Indicates whether the matched record has the module selected for the cadence. |
| Cadence | Indicates whether the matched record is in any other cadences for your account. |
Note: Only accounts that are deemed eligible can be selected to add. For example, a brand account is not eligible to be added to a Higg FEM or FSLM cadence. Additionally inactive accounts cannot be added and will not show up when you search for the account.
If an account already exists in the cadence, the selection box will be greyed out.
Immediately a module share request is sent from your account to the account you’ve added. Once the recipient reviews and accepts the share request, you will then be able to see the module data in your account’s FEM or FLSM module page. Regardless of module share status, you will be able to immediately see the completion status of each module you’ve added, from your adoption cadence dashboard. See Cadence Details section.
Adding Accounts to FSLM Cadences
The Higg FSLM reporting cycle is different from the FEM and BRM, in that accounts may have more than one FSLM per year or per cycle. To make the adoption tool usable for FSLM, users must now select which facility AND which assessment (if facility has multiple) to add to a FSLM cadence. Users will follow the same workflow for adding accounts to an Adoption Cadence, but with one additional step. Using either individual lookup or the bulk upload method, complete the account matching process. Once accounts have been selected, click Confirm Matches.

You will then get a notification saying those matches have been added to the Select Assessments step.
Once all matches have been confirmed, go to step 2 at the top of the page.
Then complete the additional step of selecting which version, purchase range, or additional parameter you would like to set for the FSLM assessments in this cadence.
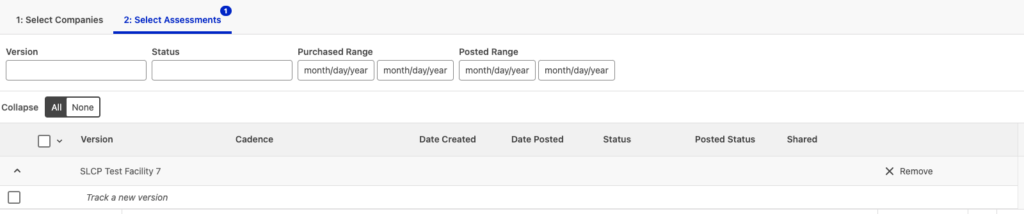
From there you can click on the selection box or use the bulk selector to Add To Cadence.
Upon successful addition, you will receive a green banner that “x” number of accounts have been added to the cadence.